

In recent weeks I’ve seen one too many bowls of rising bread dough covered with only a towel. While many of you (my mother included) rely on this as your go-to method (who can blame you, cookbooks even prescribe it), trust me that covering your dough with something better than a towel can pay big dividends for flavor and rise. Let me explain.
During the first rise in breadmaking, our goal is active fermentation. That’s why we carefully measure our yeast, pay attention to our water temperature, and even sometimes calculate desired dough temperatures. These steps support an even, healthy rate of fermentation, producing bready flavors and high-rising bakes. Good fermentation = great loaves.
Covering your dough correctly is a crucial step here. For best results, we want a non-porous, tight-fitting cover that will keep the dough from becoming too cool or developing a skin. And a towel doesn’t cut it: The porous material allows heat to escape, causing the dough to lose temperature. As the dough cools, fermentation grinds to a halt, resulting in sluggish dough with poor fermentation. (You may have read our Bread Coach piece on sluggish dough and resulting problems. Add towels to the list of things to avoid.) What’s more, the porous material that allows heat out also allows air in, drying out your dough and creating a skin that inhibits rising, shaping, and, eventually, baking. The result? Poorly fermented dough that bakes up as squat, dense bread.
To demonstrate the difference between a well-covered dough (anything that forms a non-porous, tight-fitting cover will work, such as a bowl cover or a tight-fitting lid) and a towel-covered dough, I mixed a double batch of our Classic Sandwich Bread. I placed half the dough (one loaf) into a bowl covered with a towel and the other half into a bowl with a bowl cover. I set them in the same location in my cool kitchen.
Over the course of the first rise, the dough in the towel-covered bowl dropped from 78˚F to 65˚F, while the bowl with the bowl cover on it only dropped to 74˚F. While it may seem like a small difference, that larger drop in temperature means that my towel-covered dough rises much more slowly, likely resulting in an underproofed loaf with a tight crumb and low overall volume.
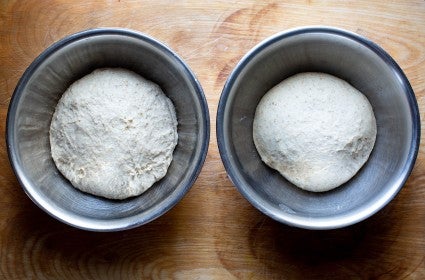
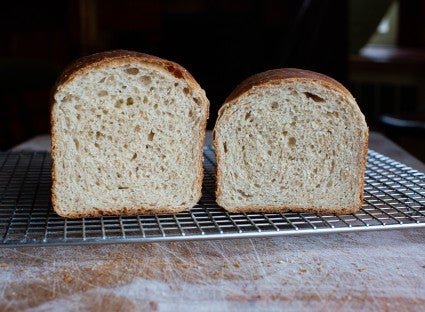
Indeed, the two doughs looked like different mixes after the first rise. One was perfect — marshmallow-y and active — while the other was sluggish and dense.
The differences didn’t end there. When I dumped the doughs out for shaping, another problem appeared: a tight skin had formed on the surface of the towel-covered dough.
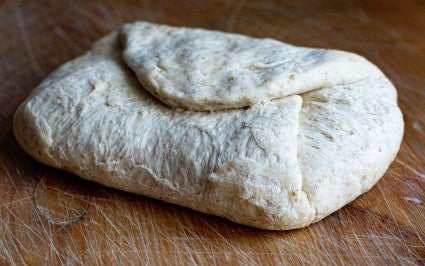
That skin proved problematic during shaping: The dry patches on the outside didn't stretch or develop tension like my well-covered, elastic dough. The leathery sections ruptured and cracked. And further, the dry skin resisted sticking to the rest of the mass, leaving me with a cracked surface and a dough prone to bursting or unraveling rather than swelling evenly during proofing and baking. In contrast, the well-covered dough was set up for success. Its moist surface adhered to itself during shaping, setting up a good final rise and a beautiful shape.
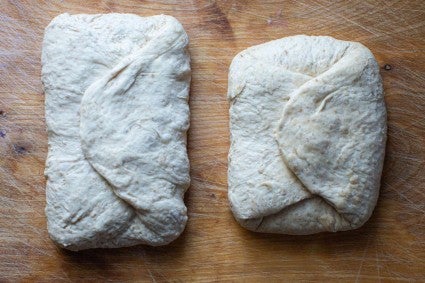
And remember how the towel-covered dough was sluggish? The volume difference is clearly apparent during shaping, with one loaf sized like a well-fed twin and the other struggling to rise.
Hopeful for some improvement during the final rise, I placed the two loaves in pans and set them in a warmer spot to encourage the towel-covered loaf towards a come-from-behind victory.
I stretched a bowl cover over one and used a towel for the other. I also extended the final rise, trying to give the sluggish dough a fighting chance. But, as with the first rise, the towel-covered loaf formed yet another skin. Argh!
After the bake, the story continued with the sluggish, skinned-over loaf and our nice, open-crumbed high-riser.
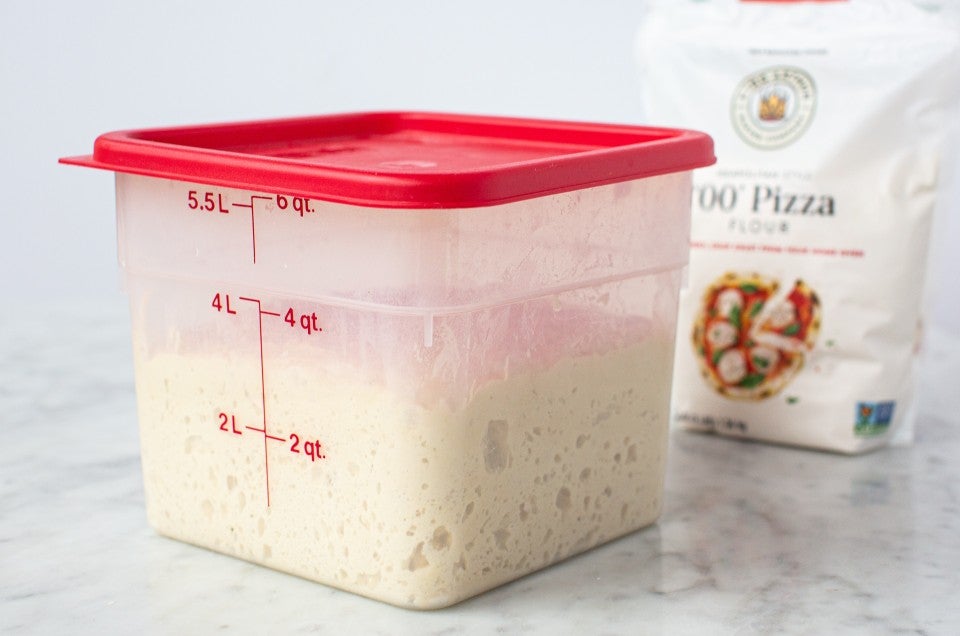
So, what can you do? Do you need to buy bowl covers? That’s certainly an option. I use them to cover my hearth-baked loaves that rise in bannetons, as well as on bowls of rising dough. I also have a few 6-quart containers that are perfect for larger batches like our Pain de Campagne.
But you don’t necessarily have to buy anything. I often just grab a large pot lid and use that over a bowl of proofing dough. A sheet tray works too — just make sure the seal is tight enough to prevent any air movement. For especially large batches I often use a food-safe trash bag, placing the entire bowl of dough inside the bag. After a few uses I use it as a trash bag so it’s not wasted.
So cover those bowls, bakers, and get ready for the high-rising, tastier days ahead!
Put your bowl-covering knowledge to use with The Easiest Loaf of Bread You'll Ever Bake:
Cover photography by Martin Philip.


June 10, 2024 at 10:15am
You did not mention how long to bake your simple white bread?
June 10, 2024 at 2:09pm
In reply to You did not mention how long… by Ruth (not verified)
Hi Ruth, here's our recipe for Classic Sandwich Bread, which includes baking instructions. This bread bakes for 30-35 minutes at 350°F.
May 30, 2024 at 8:36am
When it comes to bread making, covering your dough is a crucial step that can make all the difference in achieving a perfectly proofed loaf. By mastering the gentle cover technique, you can create a warm, draft-free environment that fosters optimal yeast growth and even rising.
December 14, 2023 at 5:30pm
Does the yeast need oxygen to rise? Does a tight plastic cover smother the yeast?
December 16, 2023 at 11:36am
In reply to Does the yeast need oxygen… by Marilyn Kocher (not verified)
Hi Marilyn, the yeast doesn't need much oxygen, and will work totally fine if you use a tight plastic cover on your dough container.
May 19, 2024 at 12:07pm
In reply to Hi Marilyn, the yeast doesn… by balpern
The tighter the lid/plastic the better the rise!
October 26, 2023 at 10:03pm
After reading a lot of comments, I’m more confused than ever. I am in the process of preparing dough for a pizza that will be baked tomorrow afternoon.
It is first rise on counter with plastic wrap over bowl.
My plan is from my first thought: refrigerate with plastic wrap and pray🙂
October 28, 2023 at 12:00pm
In reply to After reading a lot of… by Patricia (not verified)
We're sorry that the discussion following this blog post left you confused, Patricia! Our Baker's Hotline would be glad to answer any remaining questions you might have. We're here M-F from 9am-9pm EST, and Saturday and Sunday from 9am-5pm EST, and the number to call is 855-371-BAKE (2253). You can also reach us via CHAT.
October 18, 2023 at 12:30pm
The towel has to be damp! That’s always a step that is overlooked and I’ve never had an issue with my dough when using a DAMP cloth to cover. It has to be wet down.
June 10, 2023 at 7:04pm
I have been making challah regularly for 25 years, kneading it by hand and letting it rise for the first time for about an hour, 30 minutes for the second rise after it is shaped.]. I always use kitchen towels to cover the bowl and then the loaves. I grease the bowl with a tiny bit of oil and put the dough in and then flip it around so it is lightly greased on all sides. I have never had skin form on the dough. I do find that my dough rises higher when I am in Arizona than when I am on the East Coast which I have always attributed to the lack of humidity in Arizona.