
Winter Composting
Living in Canada, I’ve come to accept the fact that outdoor worm composting is a seasonal activity – but that hasn’t stopped me from trying to make it all the way through the winter with an active outdoor system!
Winter Worm Food Bin – 1-14-13

As reported in one of my VermBin48 (“The Beast”) posts towards the end of December, temperatures in my winter worm food bin dropped quite a bit after I replaced some of the warm leaves/grounds/food-waste with new materials that had been sitting out in the cold (go figure, eh? lol).
Some days later, I finally got around to doing something about it. I mixed alfalfa cubes and molasses with piping hot water – creating a warm slurry – and poured it into the food bin.
(more…)
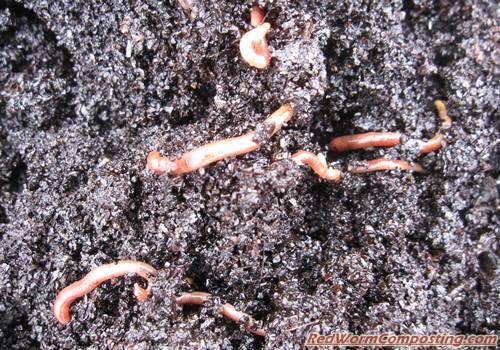
Bentley’s “Ultimate” Winter Worm Food Bin
Earlier in the fall I emptied out my “ultimate” vermicomposting bin for the sake of saving as many of the worms as I could. Interestingly enough, the conditions inside were much closer to “ultimate” than back during the summer. It was nice and moist, and there were plenty of worms to be found.
Another reason I wanted to empty the bin out was to make space for (more…)
Winter Worm Bin Experiments
By Tina Ligon

A Little History
I have been a worm wrangler since 8/2009. I live at about 8000’ in the foothills of Colorado. I started with a larger bin than usual, a converted refrigerator that is stripped down to being an insulated box. I got my first worms by volunteering for a morning at a local worm farm in Fort Collins, CO, http://www.cowormman.org/. It is a great way to get started – I learned so much in those few hours. Here is an earlier post (on the RWC blog) with more details from the first year: “Tina’s Outdoor Worm Bin Experiment“.
Winter one – I got nervous with low temperatures and added (more…)
Winter Vermicomposting Wrap-Up

Not sure what’s going on with the weather this year, but here in the middle of March we’re getting daily highs comparable to the middle of May (not sure if I should be happy or scared! LOL). This past weekend I decided I’d better convert my “winter windrow” bed into a regular outdoor worm bed so as to avoid having it completely overheat on me!
This was a pretty simple process, really – all I did was remove the tarp and cover the bed with a bunch of straw. Apart from helping to release heat, I think the added air flow (and occasional watering when we get rain) will also help to improve the quality of the habitat for the worms.
I wouldn’t be surprised if Mother Nature has a cold weather surprise or two in store for us during the next month or so, but I’m not particularly worried. We’re certainly past any chance for extended winter-like conditions.
Maybe next winter I’ll actually get the chance to test out the effectiveness of this system!
😉
Winter Vermicomposting-2-28-12

It’s been nearly a month since my last Winter Vermicomposting update (see “Winter Vermicomposting-1-30-12“), so I really wanted to get out this week and see how things have been coming along. While I had hoped to do some tinkering (as mentioned in my last post) to see if I could make the bed a bit more worm-friendly, that just didn’t end up happening, so I was a wee bit apprehensive when I pulled back the tarp yesterday.
It looks like I had nothing to worry about! As it turns out, my additions of snow, food waste and wet coffee grounds seem to have helped create lots of moist habitat for the worms. I’ve actually been diverting the coffee grounds into my wooden bin for at least the past couple of weeks (can’t remember exactly how long it’s been), so I’m wondering if this is helped to decrease the overheating and subsequent drying out of the grounds.
I was amazed to find Red Worms all over the place in the bed – up near the surface, down deep – even quite close to zones that appeared to be quite warm/dry (yep, I forgot to take my thermometer out with me again – LOL). Although the picture below doesn’t do justice to some of the observed worm densities, you can at least see how nice and moist a lot of the grounds are now. Pretty cool!
I DID end up adding more coffee grounds yesterday – one of the batches actually had a LOT of banana peels in it for some reason, so that might make things a little more interesting! I also added a bunch more snow to help keep things moist and (hopefully) a bit cooler.
Will keep everyone posted.
8)
Winter Vermicomposting-1-30-12

I finally managed to get out for a daytime check-up on my winter vermicomposting bed late last week (all my coffee grounds pick-ups are made during the evening, so I don’t really have a good opportunity to SEE what’s going on when I deposit new material). In all honesty, this winter has been pretty disappointing as far as really getting the chance to test out this system goes. Temperatures have been much warmer than normal, and we’ve gone through countless thaw/freeze cycles during the last couple of months.
Obviously it’s better than having my system freeze solid on me (lol), but I was really hoping to see how well this new bed would perform in really cold weather. Call me a pessimist, but somehow I just don’t see things changing all that much over the course of the next month or so – but ya never know! (As an interesting side note – this weekend ended up being really wintry, and we now have a fair amount of snow! lol)
Unfortunately, I forgot to take my thermometer out with me – so no “official” temperature readings – but it was pretty clear to me that the bed is still quite warm. When I pulled back the tarp, the underside was wet (not frosty), and there were loads of springtails crawling around on it.

Digging around with my garden fork released plenty of steam from below – so I’d say that was a pretty good indicator as well. I was really hoping to find some solid pockets of worms this time around – but it seems as though the upper zones of the bed are not particularly worm-friendly at the moment.
As I’ve written before, one of the challenges of using coffee grounds – aside from the heat it can generate (which can actually be “good” or “bad” depending on the time of year) – is the tendency of this material to totally dry out on you. Hot, dry conditions are not exactly ideal for the worms!
My hope was that all the food waste added would help to keep the grounds moist, but I’m finding plenty of zones that have that almost “burned” look about them (something I’ve written about in some of my older coffee grounds vermicomposting posts), as shown in the images below. This is most likely the result of fungal growth (some variety of thermophilic fungi, no doubt) – not actual combustion, of course – but regardless, these zones are still way too hot and dry for the worms to live in.


I did find higher concentrations of worms around the outer edges of the main composting zone – so that’s promising. I really just need to put more effort into keeping the grounds nice and moist.
Anyway – that’s all for now. I’ll aim to provide another update in a week or two.
8)
Winter Vermicomposting-1-02-12

Initially I was worried that my coffee grounds pick-up commitment was going to end up being a real hassle this winter. As it turns out, though, it’s been more of a blessing than anything – and I have a sneaking suspicion that this could end up being my most successful winter vermicomposting season yet. One of my challenges in past seasons has been the lack of a decent supply of composting “fuel” materials to add to my bed – especially by the time late January and February rolled around (when I needed them the most). With a steady supply of grounds that certainly won’t be the case this year.
I don’t know what it is about coffee grounds – well ok, it’s likely the small particle size (thus large total surface area) and nitrogen content – but they seem to be the “ultimate” material for getting a heap to warm up. That being said, they definitely are not an ideal material (for vermicomposting anyway) when used alone. In my experience, they tend to overheat and/or dry out, so it usually takes some time, even in outdoor beds exposed to the elements, for them to become a good quality worm habitat. One of my goals with with this winter system has been to see if I can make the grounds “worm-friendly” more quickly by mixing them with other materials.
On a whim, I decided to try something quite different right off the bat. Rather than burying the grounds down below where the worms are, I’ve simply been dumping them on top and gradually mixing them in with the thick layer of straw (originally added for insulation) using a garden fork. I’ve been making a bit more of an effort to bury the food wastes, but they are still being added up in the straw zone (above where most of the worms are).
So far, this seems to be working even better than expected. Rather than ending up with overheating down in the worm zone, it’s like I’ve created a thick, heated blanket over top of them. Over time, the lower zones of the “blanket” will undoubtedly cool off and become food/habitat for the worms as well, so I suspect that conditions in the bed will actually improve as winter progresses (not decline as they often have in the past).
Anyway – if you want to see the bed a bit more “up close and personal”, you can check out the video I made:
Stay tuned!
Will likely provide another update in a couple of weeks.
8)