The post Snapshots for IPC Fuzzing appeared first on Mozilla Hacks - the Web developer blog.
]]>By running potentially harmful code with lower privileges, the impact of a potential code execution vulnerability is mitigated. In order to gain full control, the attacker now needs to find a second vulnerability that allows bypassing these privilege restrictions – which is colloquially known as a “sandbox escape”.
In order to achieve a sandbox escape, an attacker essentially has two options: The first one is to directly attack the underlying operating system from within the compromised content process. Since every process needs to interact with the operating system for various tasks, an attacker can focus on finding bugs in these interfaces to elevate privileges.
Since we have already deployed changes to Firefox that severely limit the OS interfaces exposed to low-privilege processes, the second attack option becomes more interesting: Exploiting bugs in privileged IPC endpoints. Since low privilege content processes need to interact with the privileged parent process, the parent needs to expose certain interfaces.
If these interfaces do not perform the necessary security checks or contain memory safety errors, the content process might be able to exploit them and perform actions with higher privileges, possibly leading to an entire parent process takeover.
Traditionally , fuzzing has had multiple success stories in the history of Mozilla and allowed us to find all sorts of problems including security vulnerabilities in our code. However, applying fuzzing to our critical IPC interfaces has historically always been difficult. This is primarily because IPC interfaces cannot be tested in isolation, i.e. require the full browser for testing, and because incorrect usage of IPC interfaces can force browser restarts which introduce a prohibitive amount of latency between iterations.
To find a solution to this challenge, we engaged with the research community to apply a new method of rewinding application state during fuzzing. We saw our first results with this approach in 2021 using an experimental prototype that would later become the open source snapshot fuzzing tool called “Nyx”.
As of 2024, we are happy to announce that we are now running various snapshot fuzzing targets for IPC in production. Snapshot fuzzing is a new technology that has become more popular in recent years and we are proud of our role in bringing it from concept to practicality.
Using this technology we have already been able to identify and fix a number of potential problems in our IPC layer and we will continue to improve our testing to provide you with the most secure version of Firefox.
If you’d like to know more, or even consider contributing to Mozilla, check out our post on the security blog explaining the technical architecture behind this new tool.
The post Snapshots for IPC Fuzzing appeared first on Mozilla Hacks - the Web developer blog.
]]>The post Sponsoring sqlite-vec to enable more powerful Local AI applications appeared first on Mozilla Hacks - the Web developer blog.
]]>As a part of Mozilla Builders, we’ve launched an accelerator that developers can apply to join, but in parallel we have also been proactively recruiting specific open source projects that we feel have the potential to move AI forward and would benefit from Mozilla’s investment, expertise, and support. Our first such Builders project is llamafile, led by open source developer Justine Tunney. llamafile makes open LLMs run fast on everyday consumer hardware while also making open source AI dramatically more accessible and usable.

Today we’re proud to announce the next Mozilla Builders project: sqlite-vec. Led by independent developer Alex Garcia, this project brings vector search functionality to the beloved SQLite embedded database.
Alex has been working on this problem for a while, and we think his latest approach will have a great impact by providing application developers with a powerful new tool for building Local AI applications.

“I’m very excited for sqlite-vec to be a Mozilla Builders project”, said Alex Garcia. “I care a lot about building software that is easy to get started with and works everywhere, a trait obviously shared by other Builders projects like llamafile. AI tools are no exception — a vector database that runs everywhere means more equitable access for everyone.”
Vector databases are emerging as a key component of the AI application stack, supporting uses like retrieval augmented generation (RAG) and semantic search. But few of today’s available databases are designed for on-device use, making it harder to offer functionality like RAG in Local AI apps. SQLite is a mature and widely-deployed embedded database – in fact, it’s even built-into Mozilla’s own Firefox web browser.
The prospect of a vector-enabled SQLite opens up many new possibilities for locally-running AI applications. For example, imagine a chatbot that can answer questions about your personal data without letting a single byte of that data leave the privacy and safety of your laptop.
We’re excited to be working with Alex and supporting his efforts on sqlite-vec. We encourage you to follow the project’s progress, and Alex welcomes your contributions. And Mozilla’s Discord server is a great place to connect with Alex, the Mozilla Builders team, and everyone else in our growing community of open source practitioners. Please stop by and introduce yourself.
The post Sponsoring sqlite-vec to enable more powerful Local AI applications appeared first on Mozilla Hacks - the Web developer blog.
]]>The post Experimenting with local alt text generation in Firefox Nightly appeared first on Mozilla Hacks - the Web developer blog.
]]>Why alt text?
Web pages have a fundamentally simple structure, with semantics that allow the browser to interpret the same content differently for different people based on their own needs and preferences. This is a big part of what we think makes the Web special, and what enables the browser to act as a user agent, responsible for making the Web work for people.
This is particularly useful for assistive technology such as screen readers, which are able to work alongside browser features to reduce obstacles for people to access and exchange information. For static web pages, this generally can be accomplished with very little interaction from the site, and this access has been enormously beneficial to many people.
But even for a simple static page there are certain types of information, like alternative text for images, that must be provided by the author to provide an understandable experience for people using assistive technology (as required by the spec). Unfortunately, many authors don’t do this: the Web Almanac reported in 2022 that nearly half of images were missing alt text.
Until recently it’s not been feasible for the browser to infer reasonably high quality alt text for images, without sending potentially sensitive data to a remote server. However, latest developments in AI have enabled this type of image analysis to happen efficiently, even on a CPU.
We are adding a feature within the PDF editor in Firefox Nightly to validate this approach. As we develop it further and learn from the deployment, our goal is to offer it for users who’d like to use it when browsing to help them better understand images which would otherwise be inaccessible.
Generating alt text with small open source models
We are using Transformer-based machine learning models to describe images. These models are getting good at describing the contents of the image, yet are compact enough to operate on devices with limited resources. While can’t outperform a large language model like GPT-4 Turbo with Vision, or LLaVA, they are sufficiently accurate to provide valuable insights on-device across a diversity of hardware.
Model architectures like BLIP or even VIT that were trained on datasets like COCO (Common Object In Context) or Flickr30k are good at identifying objects in an image. When combined with a text decoder like OpenAI’s GPT-2, they can produce alternative text with 200M or fewer parameters. Once quantized, these models can be under 200MB on disk, and run in a couple of seconds on a laptop – a big reduction compared to the gigabytes and resources an LLM requires.
Example Output
The image below (pulled from the COCO dataset) is described by:
- FIREFOX – our 182M parameters model using a Distilled version of GPT-2 alongside a Vision Transformer (ViT) image encoder.
- BASELINE MODEL – a slightly bigger ViT+GPT-2 model
- HUMAN TEXT – the description provided by the dataset annotator.
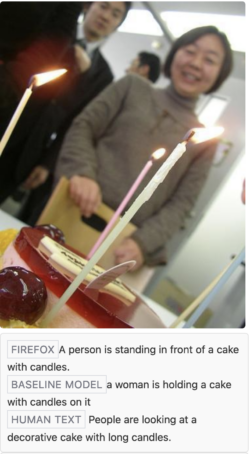
Both small models lose accuracy compared to the description provided by a person, and the baseline model is confused by the hands position. The Firefox model is doing slightly better in that case, and captures what is important.
What matters can be suggestive in any case. Notice how the person did not write about the office settings or the cherries on the cake, and specified that the candles were long.
If we run the same image on a model like GPT-4o, the results are extremely detailed:
The image depicts a group of people gathered around a cake with lit candles. The focus is on the cake, which has a red jelly topping and a couple of cherries. There are several lit candles in the foreground. In the background, there is a woman smiling, wearing a gray turtleneck sweater, and a few other people can be seen, likely in an office or indoor setting. The image conveys a celebratory atmosphere, possibly a birthday or a special occasion.
But such level of detail in alt text is overwhelming and doesn’t prioritize the most important information. Brevity is not the only goal, but it’s a helpful starting point, and pithy accuracy in a first draft allows content creators to focus their edits on missing context and details.
So if we ask the LLM for a one-sentence description, we get:
A group of people in an office celebrates with a lit birthday cake in the foreground and a smiling woman in the background.
This has more detail than our small model, but can’t be run locally without sending your image to a server.
Small is beautiful
Running inference locally with small models offers many advantages:
- Privacy: All operations are contained within the device, ensuring data privacy. We won’t have access to your images, PDF content, generated captions, or final captions. Your data will not be used to train the model.
- Resource Efficiency: Small models eliminate the need for high-powered GPUs in the cloud, reducing resource consumption and making it more environmentally friendly.
- Increased Transparency: In-house management of models allows for direct oversight of the training datasets, offering more transparency compared to some large language models (LLMs).
- Carbon Footprint Monitoring: Training models in-house facilitates precise tracking of CO2 emissions using tools such as CodeCarbon.
- Ease of Improvement: Since retraining can be completed in less than a day on a single piece of hardware, it allows for frequent updates and enhancements of the model.
Integrating Local Inference into Firefox
Extending the Translations inference architecture
Firefox Translations uses the Bergamot project powered by the Marian C++ inference runtime. The runtime is compiled into WASM, and there’s a model file for each translation task.
For example, if you run Firefox in French and visit an English page, Firefox will ask if you want to translate it to French and download the English-to-French model (~20MiB) alongside the inference runtime. This is a one-shot download: translations will happen completely offline once those files are on disk.
The WASM runtime and models are both stored in the Firefox Remote Settings service, which allows us to distribute them at scale and manage versions.
The inference task runs in a separate process, which prevents the browser or one of its tabs from crashing if the inference runtime crashes.
ONNX and Transformers.js
We’ve decided to embed the ONNX runtime in Firefox Nightly along with the Transformers.js library to extend the translation architecture to perform different inference work.
Like Bergamot, the ONNX runtime has a WASM distribution and can run directly into the browser. The ONNX project has recently introduced WebGPU support, which will eventually be activated in Firefox Nightly for this feature.
Transformers.js provides a Javascript layer on top of the ONNX inference runtime, making it easy to add inference for a huge list of model architectures. The API mimics the very popular Python library. It does all the tedious work of preparing the data that is passed to the runtime and converting the output back to a usable result. It also deals with downloading models from Hugging Face and caching them.
From the project’s documentation, this is how you can run a sentiment analysis model on a text:
import { pipeline } from '@xenova/transformers';

// Allocate a pipeline for sentiment-analysis
let pipe = await pipeline('sentiment-analysis');
let out = await pipe('I love transformers!');

// [{'label': 'POSITIVE', 'score': 0.999817686}]
Using Transformers.js gives us confidence when trying out a new model with ONNX. If its architecture is listed in the Transformers.js documentation, that’s a good indication it will work for us.
To vendor it into Firefox Nightly, we’ve slightly changed its release to distribute ONNX separately from Transformers.js, dropped Node.js-related pieces, and fixed those annoying eval() calls the ONNX library ships with. You can find the build script here which was used to populate that vendor directory.
From there, we reused the Translation architecture to run the ONNX runtime inside its own process, and have Transformers.js run with a custom model cache system.
Model caching
The Transformers.js project can use local and remote models and has a caching mechanism using the browser cache. Since we are running inference in an isolated web worker, we don’t want to provide access to the file system or store models inside the browser cache. We also don’t want to use Hugging Face as the model hub in Firefox, and want to serve model files from our own servers.
Since Transformers.js provides a callback for a custom cache, we have implemented a specific model caching layer that downloads files from our own servers and caches them in IndexedDB.
As the project grows, we anticipate the browser will store more models, which can take up significant space on disk. We plan to add an interface in Firefox to manage downloaded models so our users can list them and remove some if needed.
Fine-tuning a ViT + GPT-2 model
Ankur Kumar released a popular model on Hugging Face to generate alt text for images and blogged about it. This model was also published as ONNX weights by Joshua Lochner so it could be used in Transformers.js, see https://huggingface.co/Xenova/vit-gpt2-image-captioning
The model is doing a good job – even if in some cases we had better results with https://huggingface.co/microsoft/git-base-coco – But the GIT architecture is not yet supported in ONNX converters, and with less than 200M params, most of the accuracy is obtained by focusing on good training data. So we have picked ViT for our first model.
Ankur used the google/vit-base-patch16-224-in21k image encoder and the GPT-2 text decoder and fine-tuned them using the COCO dataset, which is a dataset of over 120k labeled images.
In order to reduce the model size and speed it up a little bit, we’ve decided to replace GPT-2 with DistilGPT-2 — which is 2 times faster and 33% smaller according to its documentation.
Using that model in Transformers.js gave good results (see the training code at GitHub – mozilla/distilvit: image-to-text model for PDF.js).
We further improved the model for our use case with an updated training dataset and some supervised learning to simplify the output and mitigate some of the biases common in image to text models.
Alt text generation in PDF.js
Firefox is able to add an image in a PDF using our popular open source pdf.js library:
Starting in Firefox 130, we will automatically generate an alt text and let the user validate it. So every time an image is added, we get an array of pixels we pass to the ML engine and a few seconds after, we get a string corresponding to a description of this image (see the code).
The first time the user adds an image, they’ll have to wait a bit for downloading the model (which can take up to a few minutes depending on your connection) but the subsequent uses will be much faster since the model will be stored locally.
In the future, we want to be able to provide an alt text for any existing image in PDFs, except images which just contain text (it’s usually the case for PDFs containing scanned books).
Next steps
Our alt text generator is far from perfect, but we want to take an iterative approach and improve it in the open. The inference engine has already landed in Firefox Nightly as a new ml component along with an initial documentation page.
We are currently working on improving the image-to-text datasets and model with what we’ve described in this blog post, which will be continuously updated on our Hugging Face page.
The code that produces the model lives in Github https://github.com/mozilla/distilvit and the web application we’re building for our team to improve the model is located at https://github.com/mozilla/checkvite. We want to make sure the models and datasets we build, and all the code used, are made available to the community.
Once the alt text feature in PDF.js has matured and proven to work well, we hope to make the feature available in general browsing for users with screen readers.
The post Experimenting with local alt text generation in Firefox Nightly appeared first on Mozilla Hacks - the Web developer blog.
]]>The post Llamafile’s progress, four months in appeared first on Mozilla Hacks - the Web developer blog.
]]>Through it all, lead developer and project visionary Justine Tunney has remained hard at work on a wide variety of fundamental improvements to the project. Just last night, Justine shipped the v0.8 release of llamafile, which includes not only support for the very latest open models, but also a number of big performance improvements for CPU inference.
As a result of Justine’s work, today llamafile is both the easiest and fastest way to run a wide range of open large language models on your own hardware. See for yourself: with llamafile, you can run Meta’s just-released LLaMA 3 model–which rivals the very best models available in its size class–on an everyday Macbook.
How did we do it? To explain that, let’s take a step back and tell you about everything that’s changed since v0.1.
tinyBLAS: democratizing GPU support for NVIDIA and AMD
llamafile is built atop the now-legendary llama.cpp project. llama.cpp supports GPU-accelerated inference for NVIDIA processors via the cuBLAS linear algebra library, but that requires users to install NVIDIA’s CUDA SDK. We felt uncomfortable with that fact, because it conflicts with our project goal of building a fully open-source and transparent AI stack that anyone can run on commodity hardware. And besides, getting CUDA set up correctly can be a bear on some systems. There had to be a better way.
With the community’s help (here’s looking at you, @ahgamut and @mrdomino!), we created our own solution: it’s called tinyBLAS, and it’s llamafile’s brand-new and highly efficient linear algebra library. tinyBLAS makes NVIDIA acceleration simple and seamless for llamafile users. On Windows, you don’t even need to install CUDA at all; all you need is the display driver you’ve probably already installed.
But tinyBLAS is about more than just NVIDIA: it supports AMD GPUs, as well. This is no small feat. While AMD commands a respectable 20% of today’s GPU market, poor software and driver support have historically made them a secondary player in the machine learning space. That’s a shame, given that AMD’s GPUs offer high performance, are price competitive, and are widely available.
One of llamafile’s goals is to democratize access to open source AI technology, and that means getting AMD a seat at the table. That’s exactly what we’ve done: with llamafile’s tinyBLAS, you can now easily make full use of your AMD GPU to accelerate local inference. And, as with CUDA, if you’re a Windows user you don’t even have to install AMD’s ROCm SDK.
All of this means that, for many users, llamafile will automatically use your GPU right out of the box, with little to no effort on your part.
CPU performance gains for faster local AI
Here at Mozilla, we are keenly interested in the promise of “local AI,” in which AI models and applications run directly on end-user hardware instead of in the cloud. Local AI is exciting because it opens up the possibility of more user control over these systems and greater privacy and security for users.
But many consumer devices lack the high-end GPUs that are often required for inference tasks. llama.cpp has been a game-changer in this regard because it makes local inference both possible and usably performant on CPUs instead of just GPUs.
Justine’s recent work on llamafile has now pushed the state of the art even further. As documented in her detailed blog post on the subject, by writing 84 new matrix multiplication kernels she was able to increase llamafile’s prompt evaluation performance by an astonishing 10x compared to our previous release. This is a substantial and impactful step forward in the quest to make local AI viable on consumer hardware.
This work is also a great example of our commitment to the open source AI community. After completing this work we immediately submitted a PR to upstream these performance improvements to llama.cpp. This was just the latest of a number of enhancements we’ve contributed back to llama.cpp, a practice we plan to continue.
Raspberry Pi performance gains
Speaking of consumer hardware, there are few examples that are both more interesting and more humble than the beloved Raspberry Pi. For a bargain basement price, you get a full-featured computer running Linux with plenty of computing power for typical desktop uses. It’s an impressive package, but historically it hasn’t been considered a viable platform for AI applications.
Not any more. llamafile has now been optimized for the latest model (the Raspberry Pi 5), and the result is that a number of small LLMs–such as Rocket-3B (download), TinyLLaMA-1.5B (download), and Phi-2 (download)–run at usable speeds on one of the least expensive computers available today. We’ve seen prompt evaluation speeds of up to 80 tokens/sec in some cases!
Keeping up with the latest models
The pace of progress in the open model space has been stunningly fast. Over the past few months, hundreds of models have been released or updated via fine-tuning. Along the way, there has been a clear trend of ever-increasing model performance and ever-smaller model sizes.
The llama.cpp project has been doing an excellent job of keeping up with all of these new models, frequently rolling-out support for new architectures and model features within days of their release.
For our part we’ve been keeping llamafile closely synced with llama.cpp so that we can support all the same models. Given the complexity of both projects, this has been no small feat, so we’re lucky to have Justine on the case.
Today, you can today use the very latest and most capable open models with llamafile thanks to her hard work. For example, we were able to roll-out llamafiles for Meta’s newest LLaMA 3 models–8B-Instruct and 70B-Instruct–within a day of their release. With yesterday’s 0.8 release, llamafile can also run Grok, Mixtral 8x22B, and Command-R.
Creating your own llamafiles
Since the day that llamafile shipped people have wanted to create their own llamafiles. Previously, this required a number of steps, but today you can do it with a single command, e.g.:
llamafile-convert [model.gguf]
In just moments, this will produce a “model.llamafile” file that is ready for immediate use. Our thanks to community member @chan1012 for contributing this helpful improvement.
In a related development, Hugging Face recently added official support for llamafile within their model hub. This means you can now search and filter Hugging Face specifically for llamafiles created and distributed by other people in the open source community.
OpenAI-compatible API server
Since it’s built on top of llama.cpp, llamafile inherits that project’s server component, which provides OpenAI-compatible API endpoints. This enables developers who are building on top of OpenAI to switch to using open models instead. At Mozilla we very much want to support this kind of future: one where open-source AI is a viable alternative to centralized, closed, commercial offerings.
While open models do not yet fully rival the capabilities of closed models, they’re making rapid progress. We believe that making it easier to pivot existing code over to executing against open models will increase demand and further fuel this progress.
Over the past few months, we’ve invested effort in extending these endpoints, both to increase functionality and improve compatibility. Today, llamafile can serve as a drop-in replacement for OpenAI in a wide variety of use cases.
We want to further extend our API server’s capabilities, and we’re eager to hear what developers want and need. What’s holding you back from using open models? What features, capabilities, or tools do you need? Let us know!
Integrations with other open source AI projects
Finally, it’s been a delight to see llamafile adopted by independent developers and integrated into leading open source AI projects (like Open Interpreter). Kudos in particular to our own Kate Silverstein who landed PRs that add llamafile support to LangChain and LlamaIndex (with AutoGPT coming soon).
If you’re a maintainer or contributor to an open source AI project that you feel would benefit from llamafile integration, let us know how we can help.
Join us!
The llamafile project is just getting started, and it’s also only the first step in a major new initiative on Mozilla’s part to contribute to and participate in the open source AI community. We’ll have more to share about that soon, but for now: I invite you to join us on the llamafile project!
The best place to connect with both the llamafile team at Mozilla and the overall llamafile community is over at our Discord server, which has a dedicated channel just for llamafile. And of course, your enhancement requests, issues, and PRs are always welcome over at our GitHub repo.
I hope you’ll join us. The next few months are going to be even more interesting and unexpected than the last, both for llamafile and for open source AI itself.
The post Llamafile’s progress, four months in appeared first on Mozilla Hacks - the Web developer blog.
]]>The post Porting a cross-platform GUI application to Rust appeared first on Mozilla Hacks - the Web developer blog.
]]>This post details the approach we have taken to rewrite the crash reporter in Rust. We discuss the reasoning behind this rewrite, what makes the crash reporter a unique application, the architecture we used, and some details of the implementation.
Why Rewrite?
Even though it is important to properly handle main process crashes, the crash reporter hasn’t received significant development in a while (aside from development to ensure that crash reports and telemetry continue to reliably be delivered)! It has long been stuck in a local maximum of “good enough” and “scary to maintain”: it features 3 individual GUI implementations (for Windows, GTK+ for Linux, and macOS), glue code abstracting a few things (mostly in C++, and Objective-C for macOS), a binary blob produced by obsoleted Apple development tools, and no test suite. Because of this, there is a backlog of features and improvements which haven’t been acted on.
We’ve recently had a number of successful pushes to decrease crash rates (including both big leaps and many small bug fixes), and the crash reporter has functioned well enough for our needs during this time. However, we’ve reached an inflection point where improving the crash reporter would provide valuable insight to enable us to decrease the crash rate even further. For the reasons previously mentioned, improving the current codebase is difficult and error-prone, so we deemed it appropriate to rewrite the application so we can more easily act on the feature backlog and improve crash reports.
Like many components of Firefox, we decided to use Rust for this rewrite to produce a more reliable and maintainable program. Besides the often-touted memory safety built into Rust, its type system and standard library make reasoning about code, handling errors, and developing cross-platform applications far more robust and comprehensive.
Crash Reporting is an Edge Case
There are a number of features of the crash reporter which make it quite unique, especially compared to other components which have been ported to Rust. For one thing, it is a standalone, individual program; basically no other components of Firefox are used in this way. Firefox itself launches many processes as a means of sandboxing and insulating against crashes, however these processes all talk to one another and have access to the same code base.
The crash reporter has a very unique requirement: it must use as little as possible of the Firefox code base, ideally none! We don’t want it to rely on code which may be buggy and cause the reporter itself to crash. Using a completely independent implementation ensures that when a main process crash does occur, the cause of that crash won’t affect the reporter’s functionality as well.
The crash reporter also necessarily has a GUI. This alone may not separate it from other Firefox components, but we can’t leverage any of the cross-platform rendering goodness that Firefox provides! So we need to implement a cross-platform GUI independent of Firefox as well. You might think we could reach for an existing cross-platform GUI crate, however we have a few reasons not to do so.
- We want to minimize the use of external code: to improve crash reporter reliability (which is paramount), we want it to be as simple and auditable as possible.
- Firefox vendors all dependencies in-tree, so we are hesitant to bring in large dependencies (GUI libraries are likely pretty sizable).
- There are only a few third-party crates that provide a native OS look and feel (or actually use native GUI APIs): it’s desirable for the crash reporter to have a native feel to be familiar to users and take advantage of accessibility features.
So all of this is to say that third-party cross-platform GUI libraries aren’t a favorable option.
These requirements significantly narrow the approach that can be used.
Building a GUI View Abstraction
In order to make the crash reporter more maintainable (and make it easier to add new features in the future), we want to have as minimal and generic platform-specific code as possible. We can achieve this by using a simple UI model that can be converted into native GUI code for each platform. Each UI implementation will need to provide two methods (over arbitrary platform-specific &self data):
/// Run a UI loop, displaying all windows of the application until it terminates.
fn run_loop(&self, app: model::Application)

/// Invoke a function asynchronously on the UI loop thread.
fn invoke(&self, f: model::InvokeFn)
The run_loop function is pretty self-explanatory: the UI implementation takes an Application model (which we’ll discuss shortly) and runs the application, blocking until the application is complete. Conveniently, our target platforms generally have similar assumptions around threading: the UI runs in a single thread and typically runs an event loop which blocks on new events until an event signaling the end of the application is received.
There are some cases where we’ll need to run a function on the UI thread asynchronously (like displaying a window, updating a text field, etc). Since run_loop blocks, we need the invoke method to define how to do this. This threading model will make it easy to use the platform GUI frameworks: everything calling native functions will occur on a single thread (the main thread in fact) for the duration of the program.
This is a good time to be a bit more specific about exactly what each UI implementation will look like. We’ll discuss pain points for each later on. There are 4 UI implementations:
- A Windows implementation using the Win32 API.
- A macOS implementation using Cocoa (AppKit and Foundation frameworks).
- A Linux implementation using GTK+ 3 (the “+” has since been dropped in GTK 4, so henceforth I’ll refer to it as “GTK”). Linux doesn’t provide its own GUI primitives, and we already ship GTK with Firefox on Linux to make a modern-feeling GUI, so we can use it for the crash reporter, too. Note that some platforms that aren’t directly supported by Mozilla (like BSDs) use the GTK implementation as well.
- A testing implementation which will allow tests to hook into a virtual UI and poke things (to simulate interactions and read state).
One last detail before we dive in: the crash reporter (at least right now) has a pretty simple GUI. Because of this, an explicit non-goal of the development was to create a separate Rust GUI crate. We wanted to create just enough of an abstraction to cover the cases we needed in the crash reporter. If we need more controls in the future, we can add them to the abstraction, but we avoided spending extra cycles to fill out every GUI use case.
Likewise, we tried to avoid unnecessary development by allowing some tolerance for hacks and built-in edge cases. For example, our model defines a Button as an element which contains an arbitrary element, but actually supporting that with Win32 or AppKit would have required a lot of custom code, so we special case on a Button containing a Label (which is all we need right now, and an easy primitive available to us). I’m happy to say there aren’t really many special cases like that at all, but we are comfortable with the few that were needed.
The UI Model
Our model is a declarative structuring of concepts mostly present in GTK. Since GTK is a mature library with proven high-level UI concepts, this made it appropriate for our abstraction and made the GTK implementation pretty simple. For instance, the simplest way that GTK does layout (using container GUI elements and per-element margins/alignments) is good enough for our GUI, so we use similar definitions in the model. Notably, this “simple” layout definition is actually somewhat high-level and complicates the macOS and Windows implementations a bit (but this tradeoff is worth the ease of creating UI models).
The top-level type of our UI model is Application. This is pretty simple: we define an Application as a set of top-level Windows (though our application only has one) and whether the current locale is right-to-left. We inspect Firefox resources to use the same locale that Firefox would, so we don’t rely on the native GUI’s locale settings.
As you might expect, each Window contains a single root element. The rest of the model is made up of a handful of typical container and primitive GUI elements:
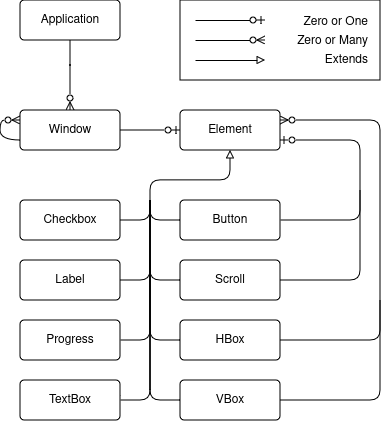
The crash reporter only needs 8 types of GUI elements! And really, Progress is used as a spinner rather than indicating any real progress as of right now, so it’s not strictly necessary (but nice to show).
Rust does not explicitly support the object-oriented concept of inheritance, so you might be wondering how each GUI element “extends” Element. The relationship represented in the picture is somewhat abstract; the implemented Element looks like:
pub struct Element {
    pub style: ElementStyle,
    pub element_type: ElementType
}
where ElementStyle contains all the common properties of elements (alignment, size, margin, visibility, and enabled state), and ElementType is an enum containing each of the specific GUI elements as variants.
Building the Model
The model elements are all intended to be consumed by the UI implementations; as such, almost all of the fields have public visibility. However, as a means of having a separate interface for building elements, we define an ElementBuilder<T> type. This type has methods that maintain assertions and provide convenience setters. For instance, many methods accept parameters that are impl Into<MemberType>, some methods like margin() set multiple values (but you can be more specific with margin_top()), etc.
There is a general impl<T> ElementBuilder<T> which provides setters for the various ElementStyle properties, and then each specific element type can also provide their own impl ElementBuilder<SpecificElement> with additional properties unique to the element type.
We combine ElementBuilder<T> with the final piece of the puzzle: a ui! macro. This macro allows us to write our UI in a declarative manner. For example, it allows us to write:
let details_window = ui! {
    Window title("Crash Details") visible(show_details) modal(true) hsize(600) vsize(400)
         halign(Alignment::Fill) valign(Alignment::Fill)
    {
         VBox margin(10) spacing(10) halign(Alignment::Fill) valign(Alignment::Fill) {
            	Scroll halign(Alignment::Fill) valign(Alignment::Fill) {
                	TextBox content(details) halign(Alignment::Fill) valign(Alignment::Fill)
            	},
            	Button halign(Alignment::End) on_click(move || *show_details.borrow_mut() = false)
             {
                 Label text("Ok")
             }
         }
     }
};
The implementation of ui! is fairly simple. The first identifier provides the element type and an ElementBuilder<T> is created. After that, the remaining method-call-like syntax forms are called on the builder (which is mutable).
Optionally, a final set of curly braces indicate that the element has children. In that case, the macro is recursively called to create them, and add_child is called on the builder with the result (so we just need to make sure a builder has an add_child method). Ultimately the syntax transformation is pretty simple, but I believe that this macro is a little bit more than just syntax sugar: it makes reading and editing the UI a fair bit clearer, since the hierarchy of elements is represented in the syntax. Unfortunately a downside is that there’s no way to support automatic formatting of such macro DSLs, so developers will need to maintain a sane formatting.
So now we have a model defined and a declarative way of building it. But we haven’t discussed any dynamic runtime behaviors here. In the above example, we see an on_click handler being set on a Button. We also see things like the Window’s visible property being set to a show_details value which is changed when on_click is pressed. We hook into this declarative UI to change or react to events at runtime using a set of simple data binding primitives with which UI implementations can interact.
Many GUI frameworks nowadays (both for Rust and other languages) have been built with the “diffing element trees” architecture (think React), where your code is (at least mostly) functional and side-effect-free and produces the GUI view as a function of the current state. This approach has its tradeoffs: for instance, it makes complicated, stateful alterations of the layout very simple to write, understand, and maintain, and encourages a clean separation of model and view! However since we aren’t writing a framework, and our application is and will remain fairly simple, the benefits of such an architecture were not worth the additional development burden. Our implementation is more similar to the MVVM architecture:
- the model is, well, the model discussed here;
- the views are the various UI implementations; and
- the viewmodel is (loosely, if you squint) the collection of data bindings.
Data Binding
There are a few types which we use to declare dynamic (runtime-changeable) values. In our UI, we needed to support a few different behaviors:
- triggering events, i.e., what happens when a button is clicked,
- synchronized values which will mirror and notify of changes to all clones, and
- on-demand values which can be queried for the current value.
On-demand values are used to get textbox contents rather than using a synchronized value, in an effort to avoid implementing debouncing in each UI. It may not be terribly difficult to do so, but it also wasn’t difficult to support the on-demand implementation.
As a means of convenience, we created a Property type which encompasses the value-oriented fields as well. A Property<T> can be set to either a static value (T), a synchronized value (Synchronized<T>), or an on-demand value (OnDemand<T>). It supports an impl From for each of these, so that builder methods can look like fn my_method(&mut self, value: impl Into<Property<T>>) allowing any supported value to be passed in a UI declaration.
We won’t discuss the implementation in depth (it’s what you’d expect), but it’s worth noting that these are all Clone to easily share the data bindings: they use Rc (we don’t need thread safety) and RefCell as necessary to access callbacks.
In the example from the last section, show_details is a Synchronized<bool> value. When it changes, the UI implementations change the associated window visibility. The Button on_click callback sets the synchronized value to false, hiding the window (note that the details window used in this example is never closed, it is just shown and hidden).
In a former iteration, data binding types had a lifetime parameter which specified the lifetime for which event callbacks were valid. While we were able to make this work, it greatly complicated the code, especially because there’s no way to communicate the correct covariance of the lifetime to the compiler, so there was additional unsafe code transmuting lifetimes (though it was contained as an implementation detail). These lifetimes were also infectious, requiring some of the complicated semantics regarding their safety to be propagated into the model types which stored Property fields.
Much of this was to avoid cloning values into the callbacks, but changing these types to all be Clone and store static-lifetime callbacks was worth making the code far more maintainable.
Threading and Thread Safety
The careful reader might remember that we discussed how our threading model involves interacting with the UI implementations only on the main thread. This includes updating the data bindings, since the UI implementations might have registered callbacks on them! While we could run everything in the main thread, it’s generally a much better experience to do as much off of the UI thread as possible, even if we don’t do much that’s blocking (though we will be blocking when we send crash reports). We want our business logic to default to being off of the main thread so that the UI doesn’t ever freeze. We can guarantee this with some careful design.
The simplest way to guarantee this behavior is to put all of the business logic in one (non-Clone, non-Sync) type (let’s call it Logic) and construct the UI and UI state (like Property values) in another type (let’s call it UI). We can then move the Logic value into a separate thread to guarantee that UI can’t interact with Logic directly, and vice versa. Of course we do need to communicate sometimes! But we want to ensure that this communication will always be delegated to the thread which owns the values (rather than the values directly interacting with each other).
We can accomplish this by creating an enqueuing function for each type and storing that in the opposite type. Such a function will be passed boxed functions to run on the owning thread that get a reference to the owned type (e.g., Box<dyn FnOnce(&T) + Send + 'static>). This is simple to create: for the UI thread, it is just the UI implementation’s invoke method which we briefly discussed previously. The Logic thread does nothing but run a loop which will get these functions and run them on the owned value (we just enqueue and pass them using an mpsc::channel). Now each type can asynchronously call methods on the other with the guarantee that they’ll be run on the correct thread.
In a former iteration, a more complicated scheme was used with thread-local storage and a central type which was responsible for both creating threads and delegating the functions. But with such a basic use case as two threads delegating between each other, we were able to distill this to the essential aspects needed, greatly simplifying the code.
Localization
One nice benefit of this rewrite is that we could bring the localization of the crash reporter up to speed with our modern tooling. In almost every other part of Firefox, we use fluent to handle localization. Using fluent in the crash reporter makes the experience of localizers more uniform and predictable; they do not need to understand more than one localization system (the crash reporter was one of the last holdouts of the old system). It was very easy to use in the new code, with just a bit of extra code to extract the localization files from the Firefox installation when the crash reporter is run. In the worst case scenario where we can’t find or access these files, we have the en-US definitions directly bundled in the crash reporter binary.
The UI Implementations
We won’t go into much detail about the implementations, but it’s worth talking about each a bit.
Linux (GTK)
The GTK implementation is probably the most straightforward and succinct. We use bindgen to generate Rust bindings to the GTK functions we need (avoiding vendoring any external crates). Then we simply call all of the corresponding GTK functions to set up the GTK widgets as described in the model (remember, the model was made to mirror some of the GTK concepts).
Since GTK is somewhat modern and meant to be written by humans (not automated tools like some of the other platforms), there weren’t really any pain points or unusual behaviors that needed to be addressed.
We have a handful of nice features to improve memory safety and correctness. A set of traits makes it easy to attach owned data to GObjects (ensuring data remains valid and is properly dropped when the GObject is destroyed), and a few macros set up the glue code between GTK signals and our data binding types.
Windows (Win32)
The Windows implementation may have been the most difficult to write, since Win32 GUIs are very rarely written nowadays and the API shows its age. We use the windows-sys crate to access bindings to the API (which was already vendored in the codebase for many other Windows API uses). This crate is generated directly from Windows function metadata (by Microsoft), but otherwise its bindings aren’t terribly different from what bindgen might have produced (though they are likely a bit more accurate).
There were a number of hurdles to overcome. For one thing, the Win32 API doesn’t provide any layout primitives, so the high-level layout concepts we use (which allow graceful resize/repositioning) had to be implemented manually. There’s also quite a few extra API calls just to get to a GUI that looks somewhat decent (correct window colors, font smoothing, high DPI handling, etc). Even the default font ends up being a terrible looking bitmapped font rather than the more modern system default; we needed to manually retrieve the system default and set it as the font to use, which was a bit surprising!
We have a set of traits to facilitate creating custom window classes and managing associated window data of class instances. We also have wrapper types to properly manage the lifetimes of handles and perform type conversions (mainly String to null-terminated wide strings and back) as an extra layer of safety around the API.
macOS (Cocoa/AppKit)
The macOS implementation had its tricky parts, as overwhelmingly macOS GUIs are written with XCode and there’s a lot of automated and generated portions (such as nibs). We again use bindgen to generate Rust bindings, this time for the Objective-C APIs in macOS framework headers.
Unlike Windows and GTK, you don’t get keyboard shortcuts like Cmd-C, Cmd-Q, etc, for free if creating a GUI without e.g. XCode (which generates it for you as part of a new project template). To have these typical shortcuts that users expect, we needed to manually implement the application main menu (which is what governs keyboard shortcuts). We also had to handle runtime setup like creating Objective-C autorelease pools, bringing the window and application (which are separate concepts) to the foreground, etc. Even implementing invoke to call a function on the main thread had its nuances, since modal windows use a nested event loop which would not call queued functions under the default NSRunLoop mode.
We wrote some simple helper types and a macro to make it easy to implement, register, and create Objective-C classes from Rust code. We used this for creating delegate classes as well as subclassing some controls for the implementation (like NSButton); it made it easy to safely manage the memory of Rust values underlying the classes and correctly register class method selectors.
The Test UI
We’ll discuss testing in the next section. Our testing UI is very simple. It doesn’t create a GUI, but allows us to interact directly with the model. The ui! macro supports an extra piece of syntax when tests are enabled to optionally set a string identifier for each element. We use these strings in unit tests to access and interact with the UI. The data binding types also support a few additional methods in tests to easily manipulate values. This UI allows us to simulate button presses, field entry, etc, to ensure that other UI state changes as expected as well as simulating the system side effects.
Mocking and Testing
An important goal of our rewrite was to add tests to the crash reporter; our old code was sorely lacking them (in part because unit testing GUIs is notoriously difficult).
Mocking Everything
In the new code, we can mock the crash reporter regardless of whether we are running tests or not (though it is always mocked for tests). This is important because mocking allows us to (manually) run the GUI in various states to check that the GUI implementations are correct and render well. Our mocking not only mocks the inputs to the crash reporter (environment variables, command line parameters, etc), it also mocks all side-effectful std functions.
We accomplish this by having a std module in the crate, and using crate::std throughout the rest of the code. When mocking is disabled, crate::std is simply the same as ::std. But when it is enabled, a bunch of functions that we have written are used instead. These mock the filesystem, environment, launching external commands, and other side effects. Importantly, only the minimal amount to mock the existing functions is implemented, so that if e.g. some new functions from std::fs, std::net, etc. are used, the crate will fail to compile with mocking enabled (so that we don’t miss any side effects). This might sound like a lot of effort, but you might be surprised at how little of std really needed to be mocked, and most implementations were pretty straightforward.
Now that we have our code using different mocked functions, we need to have a way of injecting the desired mock data (both in tests and in our normal mocked operation). For example, we have the ability to return some data when a File is read, but we need to be able to set that data differently for tests. Without going into too much detail, we accomplish this using a thread-local store of mock data. This way, we don’t need to change any code to accommodate the mock data; we only need to make changes where we set and retrieve it. The programming language enthusiasts out there may recognize this as a form of dynamic scoping. The implementation allows our mock data to be set with code like
mock::builder()
    .set(
        crate::std::env::MockCurrentExe,
        "work_dir/crashreporter".into(),
    )
    .run(|| crash_reporter_main())
in tests, and
pub fn current_exe() -> std::io::Result {
    Ok(MockCurrentExe.get(|r| r.clone()))
}
in our crate::std::env implementation.
Testing
With our mocking setup and test UI, we are able to extensively test the behavior of the crash reporter. The “last mile” of this testing which we can’t automate easily is whether each UI implementation faithfully represents the UI model. We manually test this with a mocked GUI for each platform.
Besides that, we are able to automatically test how arbitrary UI interactions cause the crash reporter to affect its own UI state and the environment (checking which programs are invoked and network connections are made, what happens if they fail, succeed, or timeout, etc). We also set up a mock filesystem and add assertions in various scenarios over the precise resulting filesystem state once the crash reporter completes. This greatly increases our confidence in the current behaviors and ensures that future changes will not alter them, which is of the utmost importance for such an essential component of our crash reporting pipeline.
The End Product
Of course we can’t get away with writing all of this without a picture of the crash reporter! This is what it looks like on Linux using GTK. The other GUI implementations look the same but styled with a native look and feel.
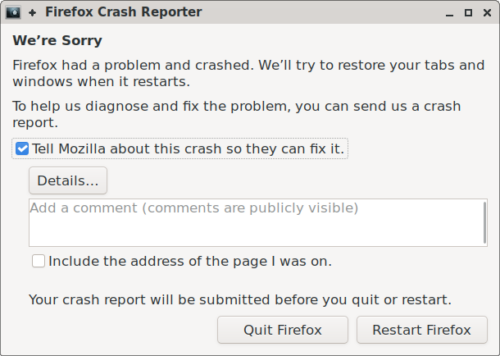
Note that, for now, we wanted to keep it looking exactly the same as it previously did. So if you are unfortunate enough to see it, it shouldn’t appear as if anything has changed!
With a new, cleaned up crash reporter, we can finally unblock a number of feature requests and bug reports, such as:
- detecting whether an installation is corrupt and telling the user to re-install Firefox,
- checking whether there is faulty memory hardware on the crashing system, and
- using the Firefox network stack for the first attempt at submitting crashes (which respects user network settings like proxies).
We are excited to iterate and improve further on crash reporter functionality. But ultimately it’d be wonderful if you never see or use it, and we are constantly working toward that goal!
The post Porting a cross-platform GUI application to Rust appeared first on Mozilla Hacks - the Web developer blog.
]]>The post Prototype even faster with the Gradio UI for Figma component library appeared first on Mozilla Hacks - the Web developer blog.
]]>Although Gradio has made the development phase of prototyping easier, the design phase has been largely the same. Even with Gradio, designers have had to create components in Figma, outline expected user flows and behaviors, and hand off designs for developers in the same way they have always done. While working on a recent exploration, we realized something was needed: a set of Figma components based on Gradio that enabled designers to create wireframes quickly.
Today, we are releasing our library of design components for Gradio for others to use. The components are based on version 4.23.0 of Gradio and will be available through our Figma profile: Mozilla Innovation Projects, https://www.figma.com/@futureatmozilla. We hope these components help teams accelerate their discovery and experimentation with ML and generative AI.
You can find out more about Gradio at https://www.gradio.app/ and more about innovation at Mozilla at https://future.mozilla.org
Thanks to Amy Chiu and Anais Ron who created the components and to the Gradio team for their work. Happy designing!
What’s Inside Gradio UI for Figma?

Because Gradio is an ever-changing prototyping kit, current components are based on version 4.23.0 of Gradio. We selected components based on their wide array of potential uses. Here is a list of the components inside the kit:
- Typography (e.g. headers, body fonts)
- Iconography (e.g. chevrons, arrows, corner expanders)
Small Components:
- Buttons
- Checkbox
- Radio
- Sliders
- Tabs
- Accordion
- Delete Button
- Error Message
- Media Type Labels
- Media Player Controller
Big Components:
- Label + Textbox
- Accordion with Label + Input
- Video Player
- Label + Counter
- Label + Slider
- Accordion + Label
- Checkbox with Label
- Radio with Label
- Accordion with Content
- Accordion with Label + Input
- Top navigation
How to Access and Use Gradio UI for Figma
To start using the library, follow these simple steps:
- Access the Library: Access the component library directly by visiting our public Figma profile (https://www.figma.com/@futureatmozilla) or by searching for “Gradio UI for Figma” within the Figma Community section of your web or desktop Figma application.
- Explore the Documentation: Familiarize yourself with the components and guidelines to make the most out of your design process.
- Connect with Us: Connect with us by following our Figma profile or emailing us at [email protected]
The post Prototype even faster with the Gradio UI for Figma component library appeared first on Mozilla Hacks - the Web developer blog.
]]>The post Improving Performance in Firefox and Across the Web with Speedometer 3 appeared first on Mozilla Hacks - the Web developer blog.
]]>This fulfills the vision set out in December 2022 to bring experts across the industry together in order to rethink how we measure browser performance, guided by a shared goal to reflect the real-world Web as much as possible. This is the first time the Speedometer benchmark, or any major browser benchmark, has been developed through a cross-industry collaboration supported by each major browser engine: Blink, Gecko, and WebKit. Working together means we can build a shared understanding of what matters to optimize, and facilitates broad review of the benchmark itself: both of which make it a stronger lever for improving the Web as a whole.
And we’re seeing results: Firefox got faster for real users in 2023 as a direct result of optimizing for Speedometer 3. This took a coordinated effort from many teams: understanding real-world websites, building new tools to drive optimizations, and making a huge number of improvements inside Gecko to make web pages run more smoothly for Firefox users. In the process, we’ve shipped hundreds of bug fixes across JS, DOM, Layout, CSS, Graphics, frontend, memory allocation, profile-guided optimization, and more.
We’re happy to see core optimizations in all the major browser engines turning into improved responsiveness for real users, and are looking forward to continuing to work together to build performance tests that improve the Web.
The post Improving Performance in Firefox and Across the Web with Speedometer 3 appeared first on Mozilla Hacks - the Web developer blog.
]]>The post Announcing Interop 2024 appeared first on Mozilla Hacks - the Web developer blog.
]]>The web platform is built on interoperability based on common standards. This offers users a degree of choice and control that sets the web apart from proprietary platforms defined by a single implementation. A commitment to ensuring that the web remains open and interoperable forms a fundamental part of Mozilla’s manifesto and web vision, and is why we’re so committed to shipping Firefox with our own Gecko engine.
However interoperability requires care and attention to maintain. When implementations ship with differences between the standard and each other, this creates a pain point for web authors; they have to choose between avoiding the problematic feature entirely and coding to specific implementation quirks. Over time if enough authors produce implementation-specific content then interoperability is lost, and along with it user agency.
This is the problem that the Interop Project is designed to address. By bringing browser vendors together to focus on interoperability, the project allows identifying areas where interoperability issues are causing problems, or may do in the near future. Tracking progress on those issues with a public metric provides accountability to the broader web community on addressing the problems.
The project works by identifying a set of high-priority focus areas: parts of the web platform where everyone agrees that making interoperability improvements will be of high value. These can be existing features where we know browsers have slightly different behaviors that are causing problems for authors, or they can be new features which web developer feedback shows is in high demand and which we want to launch across multiple implementations with high interoperability from the start. For each focus area a set of web-platform-tests is selected to cover that area, and the score is computed from the pass rate of these tests.
Interop 2023
The Interop 2023 project covered high profile features like the new :has() selector, and web-codecs, as well as areas of historically poor interoperability such as pointer events.
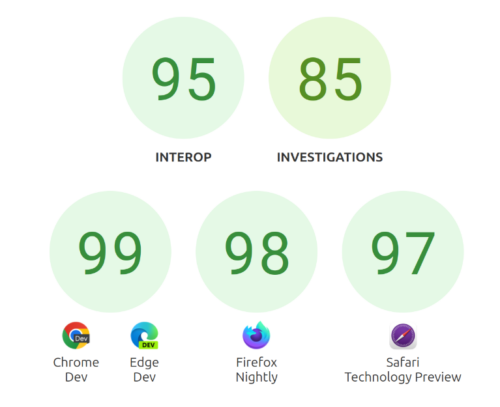
The results of the project speak for themselves: every browser ended the year with scores in excess of 97% for the prerelease versions of their browsers. Moreover, the overall Interoperability score — that is the fraction of focus area tests that pass in all participating browser engines — increased from 59% at the start of the year to 95% now. This result represents a huge improvement in the consistency and reliability of the web platform. For users this will result in a more seamless experience, with sites behaving reliably in whichever browser they prefer.
For the :has() selector — which we know from author feedback has been one of the most in-demand CSS features for a long time — every implementation is now passing 100% of the web-platform-tests selected for the focus area. Launching a major new platform feature with this level of interoperability demonstrates the power of the Interop project to progress the platform without compromising on implementation diversity, developer experience, or user choice.
As well as focus areas, the Interop project also has “investigations”. These are areas where we know that we need to improve interoperability, but aren’t at the stage of having specific tests which can be used to measure that improvement. In 2023 we had two investigations. The first was for accessibility, which covered writing many more tests for ARIA computed role and accessible name, and ensuring they could be run in different browsers. The second was for mobile testing, which has resulted in both Mobile Firefox and Chrome for Android having their initial results in wpt.fyi.
Interop 2024
Following the success of Interop 2023, we are pleased to confirm that the project will continue in 2024 with a new selection of focus areas, representing areas of the web platform where we think we can have the biggest positive impact on users and web developers.
New Focus Areas
New focus areas for 2024 include, among other things:
- Popover API – This provides a declarative mechanism to create content that always renders in the topmost-layer, so that it overlays other web page content. This can be useful for building features like tooltips and notifications. Support for popover was the #1 author request in the recent State of HTML survey.
- CSS Nesting – This is a feature that’s already shipping, which allows writing more compact and readable CSS files, without the need for external tooling such as preprocessors. However different browsers shipped slightly different behavior based on different revisions of the spec, and Interop will help ensure that everyone aligns on a single, reliable, syntax for this popular feature.
- Accessibility – Ensuring that the web is accessible to all users is a critical part of Mozilla’s manifesto. Our ability to include Accessibility testing in Interop 2024 is a direct result of the success of the Interop 2023 Accessibility Investigation in increasing the test coverage of key accessibility features.
The full list of focus areas is available in the project README.
Carryover
In addition to the new focus areas, we will carry over some of the 2023 focus areas where there’s still more work to be done. Of particular interest is the Layout focus area, which will combine the previous Flexbox, Grid and Subgrid focus area into one area covering all the most important layout primitives for the modern web. On top of that the Custom Properties, URL and Mouse and Pointer Events focus areas will be carried over. These represent cases where, even though we’ve already seen large improvements in Interoperability, we believe that users and web authors will benefit from even greater convergence between implementations.
Investigations
As well as focus areas, Interop 2024 will also feature a new investigation into improving the integration of WebAssembly testing into web-platform-tests. This will open up the possibility of including WASM features in future Interop projects. In addition we will extend the Accessibility and Mobile Testing investigations, as there is more work to be done to make those aspects of the platform fully testable across different implementations.
Partner Announcements
- Apple: The web just gets better with Interop, now for 2024
- Bocoup: Interop 2024
- Google: Interop 2024
- Igalia: Interop 2024 Launches
- Microsoft: Microsoft Edge and Interop 2024
The post Announcing Interop 2024 appeared first on Mozilla Hacks - the Web developer blog.
]]>The post Option Soup: the subtle pitfalls of combining compiler flags appeared first on Mozilla Hacks - the Web developer blog.
]]>During the Firefox 120 beta cycle, a new crash signature appeared on our radars with significant volume.
At that time, the distribution across operating systems revealed that more than 50% of the crash volume originates from Ubuntu 18.04 LTS users.
The main process crashes in a CanvasRenderer thread, with the following call stack:
0  firefox  std::locale::operator=
1  firefox  std::ios_base::imbue
2  firefox  std::basic_ios<char, std::char_traits<char> >::imbue
3  libxul.so  sh::InitializeStream<std::__cxx11::basic_ostringstream<char, std::char_traits<char>, std::allocator<char> > >  /build/firefox-ZwAdKm/firefox-120.0~b2+build1/gfx/angle/checkout/src/compiler/translator/Common.h:238
3  libxul.so  sh::TCompiler::setResourceString  /build/firefox-ZwAdKm/firefox-120.0~b2+build1/gfx/angle/checkout/src/compiler/translator/Compiler.cpp:1294
4  libxul.so  sh::TCompiler::Init  /build/firefox-ZwAdKm/firefox-120.0~b2+build1/gfx/angle/checkout/src/compiler/translator/Compiler.cpp:407
5  libxul.so  sh::ConstructCompiler  /build/firefox-ZwAdKm/firefox-120.0~b2+build1/gfx/angle/checkout/src/compiler/translator/ShaderLang.cpp:368
6  libxul.so  mozilla::webgl::ShaderValidator::Create  /build/firefox-ZwAdKm/firefox-120.0~b2+build1/dom/canvas/WebGLShaderValidator.cpp:215
6  libxul.so  mozilla::WebGLContext::CreateShaderValidator const  /build/firefox-ZwAdKm/firefox-120.0~b2+build1/dom/canvas/WebGLShaderValidator.cpp:196
7  libxul.so  mozilla::WebGLShader::CompileShader  /build/firefox-ZwAdKm/firefox-120.0~b2+build1/dom/canvas/WebGLShader.cpp:98
At first glance, we want to blame WebGL. The C++ standard library functions cannot be at fault, right?
But when looking at the WebGL code, the crash occurs in the perfectly valid lines of C++ summarized below:
std::ostringstream stream;
stream.imbue(std::locale::classic());
This code should never crash, and yet it does. In fact, taking a closer look at the stack gives a first lead for investigation:
Although we crash into functions that belong to the C++ standard library, these functions appear to live in the firefox binary.
This is an unusual situation that never occurs with official builds of Firefox.
It is however very common for distribution to change the configuration settings and apply downstream patches to an upstream source, no worries about that.
Moreover, there is only a single build of Firefox Beta that is causing this crash.
We know this thanks to a unique identifier associated with any ELF binary.
Here, if we choose any specific version of Firefox 120 Beta (such as 120b9), the crashes all embed the same unique identifier for firefox.
Now, how can we guess what build produces this weird binary?
A useful user comment mentions that they regularly experience this crash since updating to 120.0~b2+build1-0ubuntu0.18.04.1.
And by looking for this build identifier, we quickly reach the Firefox Beta PPA.
Then indeed, we are able to reproduce the crash by installing it in a Ubuntu 18.04 LTS virtual machine: it occurs when loading any WebGL page!
With the binary now at hand, running nm -D ./firefox confirms the presence of several symbols related to libstdc++ that live in the text section (T marker).
Templated and inline symbols from libstdc++ usually appear as weak (W marker), so there is only one explanation for this situation: firefox has been statically linked with libstdc++, probably through -static-libstdc++.
Fortunately, the build logs are available for all Ubuntu packages.
After some digging, we find the logs for the 120b9 build, which indeed contain references to -static-libstdc++.
But why?
Again, everything is well documented, and thanks to well trained digging skills we reach a bug report that provides interesting insights.
Firefox requires a modern C++ compiler, and hence a modern libstdc++, which is unavailable on old systems like Ubuntu 18.04 LTS.
The build uses -static-libstdc++ to close this gap.
This just explains the weird setup though.
What about the crash?
Since we can now reproduce it, we can launch Firefox in a debugger and continue our investigation.
When inspecting the crash site, we seem to crash because std::locale::classic() is not properly initialized.
Let’s take a peek at the implementation.
const locale& locale::classic()
{
  _S_initialize();
  return *(const locale*)c_locale;
}
_S_initialize() is in charge of making sure that c_locale will be properly initialized before we return a reference to it.
To achieve this, _S_initialize() calls another function, _S_initialize_once().
void locale::_S_initialize()
{
#ifdef __GTHREADS
  if (!__gnu_cxx::__is_single_threaded())
    __gthread_once(&_S_once, _S_initialize_once);
#endif

  if (__builtin_expect(!_S_classic, 0))
    _S_initialize_once();
}
In _S_initialize(), we first go through a wrapper for pthread_once(): the first thread that reaches this code consumes _S_once and calls _S_initialize_once(), whereas other threads (if any) are stuck waiting for _S_initialize_once() to complete.
This looks rather fail-proof, right?
There is even an extra direct call to _S_initialize_once() if _S_classic is still uninitialized after that.
Now, _S_initialize_once() itself is rather straightforward: it allocates _S_classic and puts it within c_locale.
void
locale::_S_initialize_once() throw()
{
  // Need to check this because we could get called once from _S_initialize()
  // when the program is single-threaded, and then again (via __gthread_once)
  // when it's multi-threaded.
  if (_S_classic)
    return;

  // 2 references.
  // One reference for _S_classic, one for _S_global
  _S_classic = new (&c_locale_impl) _Impl(2);
  _S_global = _S_classic;
  new (&c_locale) locale(_S_classic);
}
The crash looks as if we never went through _S_initialize_once(), so let’s put a breakpoint there and see what happens.
And just by doing this, we already notice something suspicious.
We do reach _S_initialize_once(), but not within the firefox binary: instead, we only ever reach the version exported by liblgpllibs.so.
In fact, liblgpllibs.so is also statically linked with libstdc++, such that firefox and liblgpllibs.so both embed and export their own _S_initialize_once() function.
By default, symbol interposition applies, and _S_initialize_once() should always be called through the procedure linkage table (PLT), so that every module ends up calling the same version of the function.
If symbol interposition were happening here, we would expect that liblgpllibs.so would reach the version of _S_initialize_once() exported by firefox rather than its own, because firefox was loaded first.
So maybe there is no symbol interposition.
This can occur when using -fno-semantic-interposition.
Each version of the standard library would live on its own, independent from the other versions.
But neither the Firefox build system nor the Ubuntu maintainer seem to pass this flag to the compiler.
However, by looking at the disassembly for _S_initialize() and _S_initialize_once(), we can see that the exported global variables (_S_once, _S_classic, _S_global) are subject to symbol interposition:
These accesses all go through the global offset table (GOT), so that every module ends up accessing the same version of the variable.
This seems strange given what we said earlier about _S_initialize_once().
Non-exported global variables (c_locale, c_locale_impl), however, are accessed directly without symbol interposition, as expected.
We now have enough information to explain the crash.
When we reach _S_initialize() in liblgpllibs.so, we actually consume the _S_once that lives in firefox, and initialize the _S_classic and _S_global that live in firefox.
But we initialize them with pointers to well initialized variables c_locale_impl and c_locale that live in liblgpllibs.so!
The variables c_locale_impl and c_locale that live in firefox, however, remain uninitialized.
So if we later reach _S_initialize() in firefox, everything looks as if initialization has happened.
But then we return a reference to the version of c_locale that lives in firefox, and this version has never been initialized.
Boom!
Now the main question is: why do we see interposition occur for _S_once but not for _S_initialize_once()?
If we step back for a minute, there is a fundamental distinction between these symbols: one is a function symbol, the other is a variable symbol.
And indeed, the Firefox build system uses the -Bsymbolic-function flag!
The ld man page describes it as follows:
-Bsymbolic-functions

When creating a shared library, bind references to global function symbols to the definition within the shared library, if any.  This option is only meaningful on ELF platforms which support shared libraries.
As opposed to:
-Bsymbolic

When creating a shared library, bind references to global symbols to the definition within the shared library, if any.  Normally, it is possible for a program linked against a shared library to override the definition within the shared library. This option is only meaningful on ELF platforms which support shared libraries.
Nailed it!
The crash occurs because this flag makes us use a weird variant of symbol interposition, where symbol interposition happens for variable symbols like _S_once and _S_classic but not for function symbols like _S_initialize_once().
This results in a mismatch regarding how we access global variables: exported global variables are unique thanks to interposition, whereas every non-interposed function will access its own version of any non-exported global variable.
With all the knowledge that we have now gathered, it is easy to write a reproducer that does not involve any Firefox code:
/* main.cc */
#include <iostream>
extern void pain();
int main() {
pain();
   std::cout << "[main] " << std::locale::classic().name() <<"\n";
   return 0;
}

/* pain.cc */

#include <iostream>
void pain() {
std::cout << "[pain] " << std::locale::classic().name() <<"\n";
}

# Makefile
all:
   $(CXX) pain.cc -fPIC -shared -o libpain.so -static-libstdc++ -Wl,-Bsymbolic-functions
   $(CXX) main.cc -fPIC -c -o main.o
   $(CC) main.o -fPIC -o main /usr/lib/gcc/x86_64-redhat-linux/13/libstdc++.a -L. -Wl,-rpath=. -lpain -Wl,-Bsymbolic-functions
   ./main

clean:
   $(RM) libpain.so main
Understanding the bug is one step, and solving it is yet another story.
Should it be considered a libstdc++ bug that the code for locales is not compatible with -static-stdlibc++ -Bsymbolic-functions?
It feels like combining these flags is a very nice way to dig our own grave, and that seems to be the opinion of the libstdc++ maintainers indeed.
Overall, perhaps the strangest part of this story is that this combination did not cause any trouble up until now.
Therefore, we suggested to the maintainer of the package to stop using -static-libstdc++.
There are other ways to use a different libstdc++ than available on the system, such as using dynamic linking and setting an RPATH to link with a bundled version.
Doing that allowed them to successfully deploy a fixed version of the package.
A few days after that, with the official release of Firefox 120, we noticed a very significant bump in volume for the same crash signature. Not again!
This time the volume was coming exclusively from users of NixOS 23.05, and it was huge!
After we shared the conclusions from our beta investigation with them, the maintainers of NixOS were able to quickly associate the crash with an issue that had not yet been backported for 23.05 and was causing the compiler to behave like -static-libstdc++.
To avoid such mess in the future, we added detection for this particular setup in Firefox’s configure.
We are grateful to the people who have helped fix this issue, in particular:
- Rico Tzschichholz (ricotz) who quickly fixed the Ubuntu 18.04 LTS package, and Amin Bandali (bandali) who provided help on the way;
- Martin Weinelt (hexa) and Artturin for their prompt fixes for the NixOS 23.05 package;
- Nicolas B. Pierron (nbp) for helping us get started with NixOS, which allowed us to quickly share useful information with the NixOS package maintainers.
The post Option Soup: the subtle pitfalls of combining compiler flags appeared first on Mozilla Hacks - the Web developer blog.
]]>The post Puppeteer Support for the Cross-Browser WebDriver BiDi Standard appeared first on Mozilla Hacks - the Web developer blog.
]]>How Do I Use Puppeteer With Firefox?
The WebDriver BiDi protocol is supported starting with Puppeteer v21.6.0. When calling puppeteer.launch pass in "firefox" as the product option, and "webDriverBiDi" as the protocol option:
const browser = await puppeteer.launch({
  product: 'firefox',
  protocol: 'webDriverBiDi',
})
You can also use the "webDriverBiDi" protocol when testing in Chrome, reflecting the fact that WebDriver BiDi offers a single standard for modern cross-browser automation.
In the future we expect "webDriverBiDi" to become the default protocol when using Firefox in Puppeteer.
Doesn’t Puppeteer Already Support Firefox?
Puppeteer has had experimental support for Firefox based on a partial re-implementation of the proprietary Chrome DevTools Protocol (CDP). This approach had the advantage that it worked without significant changes to the existing Puppeteer code. However the CDP implementation in Firefox is incomplete and has significant technical limitations. In addition, the CDP protocol itself is not designed to be cross browser, and undergoes frequent breaking changes, making it unsuitable as a long-term solution for cross-browser automation.
To overcome these problems, we’ve worked with the WebDriver Working Group at the W3C to create a standard automation protocol that meets the needs of modern browser automation clients: this is WebDriver BiDi. For more details on the protocol design and how it compares to the classic HTTP-based WebDriver protocol, see our earlier posts.
As the standardization process has progressed, the Puppeteer team has added a WebDriver BiDi backend in Puppeteer, and provided feedback on the specification to ensure that it meets the needs of Puppeteer users, and that the protocol design enables existing CDP-based tooling to easily transition to WebDriver BiDi. The result is a single protocol based on open standards that can drive both Chrome and Firefox in Puppeteer.
Are All Puppeteer Features Supported?
Not yet; WebDriver BiDi is still a work in progress, and doesn’t yet cover the full feature set of Puppeteer.
Compared to the Chrome+CDP implementation, there are some feature gaps, including support for accessing the cookie store, network request interception, some emulation features, and permissions. These features are actively being standardized and will be integrated as soon as they become available. For Firefox, the only missing feature compared to the Firefox+CDP implementation is cookie access. In addition, WebDriver BiDi already offers improvements, including better support for multi-process Firefox, which is essential for testing some websites. More information on the complete set of supported APIs can be found in the Puppeteer documentation, and as new WebDriver-BiDi features are enabled in Gecko we’ll publish details on the Firefox Developer Experience blog.
Nevertheless, we believe that the WebDriver-based Firefox support in Puppeteer has reached a level of quality which makes it suitable for many real automation scenarios. For example at Mozilla we have successfully ported our Puppeteer tests for pdf.js from Firefox+CDP to Firefox+WebDriver BiDi.
Is Firefox’s CDP Support Going Away?
We currently don’t have a specific timeline for removing CDP support. However, maintaining multiple protocols is not a good use of our resources, and we expect WebDriver BiDi to be the future of remote automation in Firefox. If you are using the CDP support outside of the context of Puppeteer, we’d love to hear from you (see below), so that we can understand your use cases, and help transition to WebDriver BiDi.
Where Can I Provide Feedback?
For any issues you experience when porting Puppeteer tests to BiDi, please open issues in the Puppeteer issue tracker, unless you can verify the bug is in the Firefox implementation, in which case please file a bug on Bugzilla.
If you are currently using CDP with Firefox, please join the #webdriver matrix channel so that we can discuss your use case and requirements, and help you solve any problems you encounter porting your code to WebDriver BiDi.
Update: The Puppeteer team have published “Harness the Power of WebDriver BiDi: Chrome and Firefox Automation with Puppeteer“.
The post Puppeteer Support for the Cross-Browser WebDriver BiDi Standard appeared first on Mozilla Hacks - the Web developer blog.
]]>The post Firefox Developer Edition and Beta: Try out Mozilla’s .deb package! appeared first on Mozilla Hacks - the Web developer blog.
]]>.deb package available for Developer Edition and Beta!
We’ve set up a new APT repository for you to install Firefox as a .deb package. These packages are compatible with the same Debian and Ubuntu versions as our traditional binaries.
Your feedback is invaluable, so don’t hesitate to report any issues you encounter to help us improve the overall experience.
Adopting Mozilla’s Firefox .deb package offers multiple benefits:
- you will get better performance thanks to our advanced compiler-based optimizations,
- you will receive the latest updates as fast as possible because the
.debis integrated into Firefox’s release process, - you will get hardened binaries with all security flags enabled during compilation,
- you can continue browsing after upgrading the package, meaning you can restart Firefox at your convenience to get the latest version.
.deb package, simply follow these steps:<code># Create a directory to store APT repository keys if it doesn't exist:
sudo install -d -m 0755 /etc/apt/keyrings
# Import the Mozilla APT repository signing key:
wget -q <a class="c-link" href="https://packages.mozilla.org/apt/repo-signing-key.gpg" target="_blank" rel="noopener noreferrer" data-stringify-link="https://packages.mozilla.org/apt/repo-signing-key.gpg" data-sk="tooltip_parent">https://packages.mozilla.org/apt/repo-signing-key.gpg</a> -O- | sudo tee /etc/apt/keyrings/packages.mozilla.org.asc > /dev/null
# The fingerprint should be 35BAA0B33E9EB396F59CA838C0BA5CE6DC6315A3
gpg -n -q --import --import-options import-show /etc/apt/keyrings/packages.mozilla.org.asc | awk '/pub/{getline; gsub(/^ +| +$/,""); print "\n"$0"\n"}'
# Next, add the Mozilla APT repository to your sources list:
echo "deb [signed-by=/etc/apt/keyrings/packages.mozilla.org.asc] <a class="c-link" href="https://packages.mozilla.org/apt" target="_blank" rel="noopener noreferrer" data-stringify-link="https://packages.mozilla.org/apt" data-sk="tooltip_parent">https://packages.mozilla.org/apt</a> mozilla main" | sudo tee -a /etc/apt/sources.list.d/mozilla.list > /dev/null
# Update your package list and install the Firefox .deb package:
sudo apt-get update && sudo apt-get install firefox-beta # Replace "beta" by "devedition" for Developer Editionfr in the example below with the desired language code:sudo apt-get install firefox-beta-l10n-frsudo apt-get update:apt-cache search firefox-beta-l10n
The post Firefox Developer Edition and Beta: Try out Mozilla’s .deb package! appeared first on Mozilla Hacks - the Web developer blog.
]]>With llamafile, you can effortlessly convert large language model (LLM) weights into executables. Imagine transforming a 4GB file of LLM weights into a binary that runs smoothly on six different operating systems, without requiring installation.
The post Introducing llamafile appeared first on Mozilla Hacks - the Web developer blog.
]]>Today we’re announcing the first release of llamafile and inviting the open source community to participate in this new project.
llamafile lets you turn large language model (LLM) weights into executables.
Say you have a set of LLM weights in the form of a 4GB file (in the commonly-used GGUF format). With llamafile you can transform that 4GB file into a binary that runs on six OSes without needing to be installed.
This makes it dramatically easier to distribute and run LLMs. It also means that as models and their weights formats continue to evolve over time, llamafile gives you a way to ensure that a given set of weights will remain usable and perform consistently and reproducibly, forever.
We achieved all this by combining two projects that we love: llama.cpp (a leading open source LLM chatbot framework) with Cosmopolitan Libc (an open source project that enables C programs to be compiled and run on a large number of platforms and architectures). It also required solving several interesting and juicy problems along the way, such as adding GPU and dlopen() support to Cosmopolitan; you can read more about it in the project’s README.
This first release of llamafile is a product of Mozilla’s innovation group and developed by Justine Tunney, the creator of Cosmopolitan. Justine has recently been collaborating with Mozilla via MIECO, and through that program Mozilla funded her work on the 3.0 release (Hacker News discussion) of Cosmopolitan. With llamafile, Justine is excited to be contributing more directly to Mozilla projects, and we’re happy to have her involved.
llamafile is licensed Apache 2.0, and we encourage contributions. Our changes to llama.cpp itself are licensed MIT (the same license used by llama.cpp itself) so as to facilitate any potential future upstreaming. We’re all big fans of llama.cpp around here; llamafile wouldn’t have been possible without it and Cosmopolitan.
We hope llamafile is useful to you and look forward to your feedback.
The post Introducing llamafile appeared first on Mozilla Hacks - the Web developer blog.
]]>The post Mozilla AI Guide Launch with Summarization Code Example appeared first on Mozilla Hacks - the Web developer blog.
]]>Our vision is for the AI Guide to be the starting point for every new developer to the space and a place to revisit for clarity and inspiration, ensuring that AI innovations enrich everyday life. The AI Guide’s initial focus begins with language models and the aim is to become a collaborative community-driven resource covering other types of models.
To start the first few sections in the Mozilla AI Guide go in-depth on the most asked questions about Large Language Models (LLMs). AI Basics covers the concepts of AI, ML, LLMs, what these concepts mean and how they are related. This section also breaks down the pros and cons of using an LLM. Language Models 101 continues to build on the shared knowledge of AI basics and dives deeper into the next level with language models. It will answer questions such as “What does ‘training’ an ML model mean” or “What is ‘human in the loop’ approach?”
We will jump to the last section on Choosing ML Models and demonstrate in code below what can be done using open source models to summarize certain text. You can access the Colab Notebook here or continue reading:
First Steps with Language Models
Unlike other guides, this one is designed to help pick the right model for whatever it is you’re trying to do, by:
- teaching you how to always remain on the bleeding edge of published AI research
- broadening your perspective on current open options for any given task
- not be tied to a closed-source / closed-data large language model (ex OpenAI, Anthropic)
- creating a data-led system for always identifying and using the state-of-the-art (SOTA) model for any particular task.
We’re going to hone in on “text summarization” as our first task.
So… why are we not using one of the popular large language models?
Great question. Most available LLMs worth their salt can do many tasks, including summarization, but not all of them may be good at what specifically you want them to do. We should figure out how to evaluate whether they actually can or not.
Also, many of the current popular LLMs are not open, are trained on undisclosed data and exhibit biases. Responsible AI use requires careful choices, and we’re here to help you make them.
Finally, most large LLMs require powerful GPU compute to use. While there are many models that you can use as a service, most of them cost money per API call. Unnecessary when some of the more common tasks can be done at good quality with already available open models and off-the-shelf hardware.
Why do using open models matter?
Over the last few decades, engineers have been blessed with being able to onboard by starting with open source projects, and eventually shipping open source to production. This default state is now at risk.
Yes, there are many open models available that do a great job. However, most guides don’t discuss how to get started with them using simple steps and instead bias towards existing closed APIs.
Funding is flowing to commercial AI projects, who have larger budgets than open source contributors to market their work, which inevitably leads to engineers starting with closed source projects and shipping expensive closed projects to production.
Our First Project – Summarization
We’re going to:
- Find text to summarize.
- Figure out how to summarize them using the current state-of-the-art open source models.
- Write some code to do so.
- Evaluate quality of results using relevant metrics
For simplicity’s sake, let’s grab Mozilla’s Trustworthy AI Guidelines in string form
Note that in the real world, you will likely have to use other libraries to extract content for any particular file type.
import textwrap

content = """Mozilla's "Trustworthy AI" Thinking Points:

PRIVACY: How is data collected, stored, and shared? Our personal data powers everything from traffic maps to targeted advertising. Trustworthy AI should enable people to decide how their data is used and what decisions are made with it.

FAIRNESS: We’ve seen time and again how bias shows up in computational models, data, and frameworks behind automated decision making. The values and goals of a system should be power aware and seek to minimize harm. Further, AI systems that depend on human workers should protect people from exploitation and overwork.

TRUST: People should have agency and control over their data and algorithmic outputs, especially considering the high stakes for individuals and societies. For instance, when online recommendation systems push people towards extreme, misleading content, potentially misinforming or radicalizing them.

SAFETY: AI systems can carry high risk for exploitation by bad actors. Developers need to implement strong measures to protect our data and personal security. Further, excessive energy consumption and extraction of natural resources for computing and machine learning accelerates the climate crisis.

TRANSPARENCY: Automated decisions can have huge personal impacts, yet the reasons for decisions are often opaque. We need to mandate transparency so that we can fully understand these systems and their potential for harm."""
Great. Now we’re ready to start summarizing.
A brief pause for context
The AI space is moving so fast that it requires a tremendous amount of catching up on scientific papers each week to understand the lay of the land and the state of the art.
It’s some effort for an engineer who is brand new to AI to:
- discover which open models are even out there
- which models are appropriate for any particular task
- which benchmarks are used to evaluate those models
- which models are performing well based on evaluations
- which models can actually run on available hardware
For the working engineer on a deadline, this is problematic. There’s not much centralized discourse on working with open source AI models. Instead there are fragmented X (formerly Twitter) threads, random private groups and lots of word-of-mouth transfer.
However, once we have a workflow to address all of the above, you will have the means to forever be on the bleeding age of published AI research
How do I get a list of available open summarization models?
For now, we recommend Huggingface and their large directory of open models broken down by task. This is a great starting point. Note that larger LLMs are also included in these lists, so we will have to filter.
In this huge list of summarization models, which ones do we choose?
We don’t know what any of these models are trained on. For example, a summarizer trained on news articles vs Reddit posts will perform better on news articles.
What we need is a set of metrics and benchmarks that we can use to do apples-to-apples comparisons of these models.
How do I evaluate summarization models?
The steps below can be used to evaluate any available model for any task. It requires hopping between a few sources of data for now, but we will be making this a lot easier moving forward.
Steps:
- Find the most common datasets used to train models for summarization.
- Find the most common metrics used to evaluate models for summarization across those datasets.
- Do a quick audit on training data provenance, quality and any exhibited biases, to keep in line with Responsible AI usage.
Finding datasets
The easiest way to do this is using Papers With Code, an excellent resource for finding the latest scientific papers by task that also have code repositories attached.
First, filter Papers With Code’s “Text Summarization” datasets by most cited text-based English datasets.
Let’s pick (as of this writing) the most cited dataset — the “CNN/DailyMail” dataset. Usually most cited is one marker of popularity.
Now, you don’t need to download this dataset. But we’re going to review the info Papers With Code have provided to learn more about it for the next step. This dataset is also available on Huggingface.
You want to check 3 things:
- license
- recent papers
- whether the data is traceable and the methods are transparent
First, check the license. In this case, it’s MIT licensed, which means it can be used for both commercial and personal projects.
Next, see if the papers using this dataset are recent. You can do this by sorting Papers in descending order. This particular dataset has many papers from 2023 – great!
Finally, let’s check whether the data is from a credible source. In this case, the dataset was generated by IBM in partnership with the University of Montréal. Great.
Now, let’s dig into how we can evaluate models that use this dataset.
Evaluating models
Next, we look for measured metrics that are common across datasets for the summarization task. BUT, if you’re not familiar with the literature on summarization, you have no idea what those are.
To find out, pick a “Subtask” that’s close to what you’d like to see. We’d like to summarize the CNN article we pulled down above, so let’s choose “Abstractive Text Summarization”.
Now we’re in business! This page contains a significant amount of new information.
There are mentions of three new terms: ROUGE-1, ROUGE-2 and ROUGE-L. These are the metrics that are used to measure summarization performance.
There is also a list of models and their scores on these three metrics – this is exactly what we’re looking for.
Assuming we’re looking at ROUGE-1 as our metric, we now have the top 3 models that we can evaluate in more detail. All 3 are close to 50, which is a promising ROUGE score (read up on ROUGE).
Testing out a model
OK, we have a few candidates, so let’s pick a model that will run on our local machines. Many models get their best performance when running on GPUs, but there are many that also generate summaries fast on CPUs. Let’s pick one of those to start – Google’s Pegasus.
# first we install huggingface's transformers library
%pip install transformers sentencepiece
Then we find Pegasus on Huggingface. Note that part of the datasets Pegasus was trained on includes CNN/DailyMail which bodes well for our article summarization. Interestingly, there’s a variant of Pegasus from google that’s only trained on our dataset of choice, we should use that.
from transformers import PegasusForConditionalGeneration, PegasusTokenizer
import torch

# Set the seed, this will help reproduce results. Changing the seed will
# generate new results
from transformers import set_seed
set_seed(248602)

# We're using the version of Pegasus specifically trained for summarization
# using the CNN/DailyMail dataset
model_name = "google/pegasus-cnn_dailymail"

# If you're following along in Colab, switch your runtime to a
# T4 GPU or other CUDA-compliant device for a speedup
device = "cuda" if torch.cuda.is_available() else "cpu"

# Load the tokenizer
tokenizer = PegasusTokenizer.from_pretrained(model_name)

# Load the model
model = PegasusForConditionalGeneration.from_pretrained(model_name).to(device)

# Tokenize the entire content
batch = tokenizer(content, padding="longest", return_tensors="pt").to(device)

# Generate the summary as tokens
summarized = model.generate(**batch)

# Decode the tokens back into text
summarized_decoded = tokenizer.batch_decode(summarized, skip_special_tokens=True)
summarized_text = summarized_decoded[0]

# Compare
def compare(original, summarized_text):
  print(f"Article text length: {len(original)}\n")
  print(textwrap.fill(summarized_text, 100))
  print()
  print(f"Summarized length: {len(summarized_text)}")

compare(content, summarized_text)
Article text length: 1427 Trustworthy AI should enable people to decide how their data is used.<n>values and goals of a system should be power aware and seek to minimize harm.<n>People should have agency and control over their data and algorithmic outputs.<n>Developers need to implement strong measures to protect our data and personal security. Summarized length: 320
Alright, we got something! Kind of short though. Let’s see if we can make the summary longer…
set_seed(860912)
# Generate the summary as tokens, with a max_new_tokens
summarized = model.generate(**batch, max_new_tokens=800)
summarized_decoded = tokenizer.batch_decode(summarized, skip_special_tokens=True)
summarized_text = summarized_decoded[0]
compare(content, summarized_text)
Article text length: 1427

Trustworthy AI should enable people to decide how their data is used.<n>values and goals of a system
should be power aware and seek to minimize harm.<n>People should have agency and control over their
data and algorithmic outputs.<n>Developers need to implement strong measures to protect our data and
personal security.

Summarized length: 320
Well, that didn’t really work. Let’s try a different approach called ‘sampling’. This allows the model to pick the next word according to its conditional probability distribution (specifically, the probability that said word follows the word before).
We’ll also be setting the ‘temperature’. This variable works to control the levels of randomness and creativity in the generated output.
set_seed(118511)
summarized = model.generate(**batch, do_sample=True, temperature=0.8, top_k=0)
summarized_decoded = tokenizer.batch_decode(summarized, skip_special_tokens=True)
summarized_text = summarized_decoded[0]
compare(content, summarized_text)
Article text length: 1427 Mozilla's "Trustworthy AI" Thinking Points:.<n>People should have agency and control over their data and algorithmic outputs.<n>Developers need to implement strong measures to protect our data. Summarized length: 193
Shorter, but the quality is higher. Adjusting the temperature up will likely help.
set_seed(108814)
summarized = model.generate(**batch, do_sample=True, temperature=1.0, top_k=0)
summarized_decoded = tokenizer.batch_decode(summarized, skip_special_tokens=True)
summarized_text = summarized_decoded[0]
compare(content, summarized_text)
Article text length: 1427 Mozilla's "Trustworthy AI" Thinking Points:.<n>People should have agency and control over their data and algorithmic outputs.<n>Developers need to implement strong measures to protect our data and personal security.<n>We need to mandate transparency so that we can fully understand these systems and their potential for harm. Summarized length: 325
Now let’s play with one other generation approach called top_k sampling — instead of considering all possible next words in the vocabulary, the model only considers the top ‘k’ most probable next words.
This technique helps to focus the model on likely continuations and reduces the chances of generating irrelevant or nonsensical text.
It strikes a balance between creativity and coherence by limiting the pool of next-word choices, but not so much that the output becomes deterministic.
set_seed(226012)
summarized = model.generate(**batch, do_sample=True, top_k=50)
summarized_decoded = tokenizer.batch_decode(summarized, skip_special_tokens=True)
summarized_text = summarized_decoded[0]
compare(content, summarized_text)
Article text length: 1427 Mozilla's "Trustworthy AI" Thinking Points look at ethical issues surrounding automated decision making.<n>values and goals of a system should be power aware and seek to minimize harm.People should have agency and control over their data and algorithmic outputs.<n>Developers need to implement strong measures to protect our data and personal security. Summarized length: 355
Finally, let’s try top_p sampling — also known as nucleus sampling, is a strategy where the model considers only the smallest set of top words whose cumulative probability exceeds a threshold ‘p’.
Unlike top_k which considers a fixed number of words, top_p adapts based on the distribution of probabilities for the next word. This makes it more dynamic and flexible. It helps create diverse and sensible text by allowing less probable words to be selected when the most probable ones don’t add up to ‘p’.
set_seed(21420041)
summarized = model.generate(**batch, do_sample=True, top_p=0.9, top_k=50)
summarized_decoded = tokenizer.batch_decode(summarized, skip_special_tokens=True)
summarized_text = summarized_decoded[0]
compare(content, summarized_text)

# saving this for later.
pegasus_summarized_text = summarized_text
Article text length: 1427 Mozilla's "Trustworthy AI" Thinking Points:.<n>People should have agency and control over their data and algorithmic outputs.<n>Developers need to implement strong measures to protect our data and personal security.<n>We need to mandate transparency so that we can fully understand these systems and their potential for harm. Summarized length: 325
To continue with the code example and see a test with another model, and to learn how to evaluate ML model results (a whole another section), click here to view the Python Notebook and click “Open in Colab” to experiment with your own custom code.
Note this guide will be constantly updated and new sections on Data Retrieval, Image Generation, and Fine Tuning will be coming next.
Developer Contributions Are Vital
Shortly after today’s launch of the Mozilla AI Guide, we will be publishing our community contribution guidelines. It will provide guidance on the type of content developers can contribute and how it can be shared. Get ready to share any great open source AI projects, implementations, video and audio models.
Together, we can bring together a cohesive, collaborative and responsible AI community.
A special thanks to Kevin Li and Pradeep Elankumaran who pulled this great blog post together.
The post Mozilla AI Guide Launch with Summarization Code Example appeared first on Mozilla Hacks - the Web developer blog.
]]>The post Down and to the Right: Firefox Got Faster for Real Users in 2023 appeared first on Mozilla Hacks - the Web developer blog.
]]>This can be especially challenging with complex client software running third-party code like Firefox, and it’s a big reason why we’ve undertaken the Speedometer 3 effort alongside other web browsers. Our goal is to build performance tests that simulate real-world user experiences so that browsers have better tools to drive improvements for real users on real webpages. While it’s easy to see that benchmarks have improved in Firefox throughout the year as a result of this work, what we really care about is how much those wins are being felt by our users.
In order to measure the user experience, Firefox collects a wide range of anonymized timing metrics related to page load, responsiveness, startup and other aspects of browser performance. Collecting data while holding ourselves to the highest standards of privacy can be challenging. For example, because we rely on aggregated metrics, we lack the ability to pinpoint data from any particular website. But perhaps even more challenging is analyzing the data once collected and drawing actionable conclusions. In the future we’ll talk more about these challenges and how we’re addressing them, but in this post we’d like to share how some of the metrics that are fundamental to how our users experience the browser have improved throughout the year.
Let’s start with page load. First Contentful Paint (FCP) is a better metric for felt performance than the `onload` event. We’re tracking the time it takes between receiving the first byte from the network to FCP. This tells us how much faster we are giving feedback to the user that the page is successfully loading, so it’s a critical metric for understanding the user experience. While much of this is up to web pages themselves, if the browser improves performance across the board, we expect this number to go down.

Image 1 – Median time from Response Start to First Contentful Paint in milliseconds
We can see that this time improved from roughly 250ms at the start of the year to 215ms in October. This means that a user receives feedback on page loads almost 15% faster than they did at the start of the year. And it’s important to note that this is all the result of optimization work that didn’t even explicitly target pageload.
In order to understand where this improvement is coming from, let’s look at another piece of timing data: the amount of time that was spent executing JavaScript code during a pageload. Here we are going to look at the 95th percentile, representing the most JS heavy pages and highlighting a big opportunity for us to remove friction for users.

Image 2 – 95th Percentile of JS execution time during pageload in milliseconds
This shows the 95th percentile improving from ~1560ms at the beginning of the year, to ~1260ms in October. This represents a considerable improvement of 300ms, or almost 20%, and is likely responsible for a significant portion of the reduced FCP times. This makes sense, since Speedometer 3 work has led to significant optimizations to the SpiderMonkey JavaScript engine (a story for another post).
We’d also like to know how responsive pages are after they are loaded. For example, how smooth is the response when typing on the keyboard as I write this blogpost! The primary metric we collect here is the “keypress present latency”; the time between a key being pressed on the keyboard and its result being presented onto the screen. Rendering some text to the screen may sound simple, but there’s a lot going on to make that happen – especially when web pages run main thread JavaScript to respond to the keypress event. Most typing is snappy and primarily limited by hardware (e.g. the refresh rate of the monitor), but it’s extremely disruptive when it’s not. This means it’s important to mitigate the worst cases, so we’ll again look at the 95th percentile.

Image 3 – 95th Percentile of the keypress present latency
Once again we see a measurable improvement. The 95th percentile hovered around 65ms for most of the year and dropped to under 59ms after the Firefox 116 and 117 releases in August. A 10% improvement to the slowest keypresses means users are experiencing more instantaneous feedback and fewer disruptions while typing.
We’ve been motivated by the improvements we’re seeing in our telemetry data, and we’re convinced that our efforts this year are having a positive effect on Firefox users. We have many more optimizations in the pipeline and will share more details about those and our overall progress in future posts.
The post Down and to the Right: Firefox Got Faster for Real Users in 2023 appeared first on Mozilla Hacks - the Web developer blog.
]]>The post Built for Privacy: Partnering to Deploy Oblivious HTTP and Prio in Firefox appeared first on Mozilla Hacks - the Web developer blog.
]]>Mozilla builds a number of tools that help people defend their privacy online, but the need for these tools reflects a world where companies view invasive data collection as necessary for building good products and making money. A zero-sum game between privacy and business interests is not a healthy state of affairs. Therefore, we dedicate considerable effort to developing and advancing new technologies that enable businesses to achieve their goals without compromising peoples’ privacy. This is a focus of our work on web standards, as well as in how we build Firefox itself.
Building an excellent browser while maintaining a high standard for privacy sometimes requires this kind of new technology. For example: we put a lot of effort into keeping Firefox fast. This involves extensive automated testing, but also monitoring how it’s performing for real users. Firefox currently reports generic performance metrics like page-load time but does not associate those metrics with specific sites, because doing so would reveal peoples’ browsing history. These internet-wide averages are somewhat informative but not particularly actionable. Sites are constantly deploying code changes and occasionally those changes can trigger performance bugs in browsers. If we knew that a specific site got much slower overnight, we could likely isolate the cause and fix it. Unfortunately, we lack that visibility today, which hinders our ability to make Firefox great.
This is a classic problem in data collection: We want aggregate data, but the naive way to get it involves collecting sensitive information about individual people. The solution is to develop technology that delivers the same insights while keeping information about any individual person verifiably private.
In recent years, Mozilla has worked with others to advance two such technologies — Oblivious HTTP and the Prio-based Distributed Aggregation Protocol (DAP) — towards being proper internet standards that are practical to deploy in production. Oblivious HTTP works by routing encrypted data through an intermediary to conceal its source, whereas DAP/Prio splits the data into two shares and sends each share to a different server [1]. Despite their different shapes, both technologies rely on a similar principle: By processing the data jointly across two independent parties, they ensure neither party holds the information required to reveal sensitive information about someone.
We therefore need to partner with another independent and trustworthy organization to deploy each technology in Firefox. Having worked for some time to develop and validate both technologies in staging environments, we’ve now taken the next step to engage Fastly to operate an OHTTP relay and Divvi Up to operate a DAP aggregator. Both Fastly and ISRG (the nonprofit behind Divvi Up and Let’s Encrypt) have excellent reputations for acting with integrity, and they have staked those reputations on the faithful operation of these services. So even in a mirror universe where we tried to persuade them to cheat, they have a strong incentive to hold the line.
Our objective at Mozilla is to develop viable alternatives to the things that are wrong with the internet today and move the entire industry by demonstrating that it’s possible to do better. In the short term, these technologies will help us keep Firefox competitive while adhering to our longstanding principles around sensitive data. Over the long term, we want to see these kinds of strong privacy guarantees become the norm, and we will continue to work towards such a future.
Footnotes:
[1] Each approach is best-suited to different scenarios, which is why we’re investing in both. Oblivious HTTP is more flexible and can be used in interactive contexts, whereas DAP/Prio can be used in situations where the payload itself might be identifying.
The post Built for Privacy: Partnering to Deploy Oblivious HTTP and Prio in Firefox appeared first on Mozilla Hacks - the Web developer blog.
]]>The post Faster Vue.js Execution in Firefox appeared first on Mozilla Hacks - the Web developer blog.
]]>This requires a deliberate analysis of the ecosystem — starting with real user experiences and identifying the essential technical elements underlying them. We built several new tests from scratch, and also updated some existing tests from Speedometer 2 to use more modern versions of widely-used JavaScript frameworks.
When the Vue.js test was updated from Vue 2 to Vue 3, we noticed some performance issues in Firefox. The root of the problem was Proxy object usage that was introduced in Vue 3.
Proxies are hard to optimize because they’re generic by design and can behave in all sorts of surprising ways (e.g., modifying trap functions after initialization, or wrapping a Proxy with another Proxy). They also weren’t used much on the performance-critical path when they were introduced, so we focused primarily on correctness in the original implementation.
Speedometer 3 developed evidence that some Proxies today are well-behaved, critical-path, and widely-used. So we optimized these to execute completely in the JIT — specializing for the shapes of the Proxies encountered at the call-site and avoiding redundant work. This makes reactivity in Vue.js significantly faster, and we also anticipate improvements on other workloads.
This change landed in Firefox 118, so it’s currently on Beta and will ride along to Release by the end of September.
Over the course of the year Firefox has improved by around 40% on the Vue.js benchmark from work like this. More importantly, and as we hoped, we’re observing real user metric improvements across all page loads in Firefox as we optimize Speedometer 3. We’ll share more details about this in a subsequent post.
The post Faster Vue.js Execution in Firefox appeared first on Mozilla Hacks - the Web developer blog.
]]>The post Autogenerating Rust-JS bindings with UniFFI appeared first on Mozilla Hacks - the Web developer blog.
]]>
I work on the Firefox sync team at Mozilla. Four years ago, we wrote a blog post describing our strategy to ship cross-platform Rust components for syncing and storage on all our platforms. The vision was to consolidate the separate implementations of features like history, logins, and syncing that existed on Firefox Desktop, Android, and iOS.
We would replace those implementations with a core written in Rust and a set of hand-written foreign language wrappers for each platform: JavaScript for Desktop, Kotlin for Android, and Swift for iOS.
Since then, we’ve learned some lessons and had to modify our strategy. It turns out that creating hand-written wrappers in multiple languages is a huge time-sink. The wrappers required a significant amount of time to write, but more importantly, they were responsible for many serious bugs.
These bugs were easy to miss, hard to debug, and often led to crashes. One of the largest benefits of Rust is memory safety, but these hand-written wrappers were negating much of that benefit.
To solve this problem, we developed UniFFI: a Rust library for auto-generating foreign language bindings. UniFFI allowed us to create wrappers quickly and safely, but there was one issue: UniFFI supported Kotlin and Swift, but not JavaScript, which powers the Firefox Desktop front-end. UniFFI helped us ship shared components for Firefox Android and iOS, but Desktop remained out of reach.
This changed with Firefox 105 when we added support for generating JavaScript bindings via UniFFI which enabled us to continue pushing forward on our single component vision. This project validated some core concepts that have been in UniFFI from the start but also required us to extend UniFFI in several ways. This blog post will walk through some of the issues that arose along the way and how we handled them.
Prior Art
This project has already been tried at least once before at Mozilla. The team was able to get some of the functionality supported, but some parts remained out of reach. One of the first things we realized was that the general approach the previous attempts took would probably not support the UniFFI features we were using in our components.
Does this mean the previous work was a failure? Absolutely not. The team left behind a wonderful trove of design documents, discussions, and code that we made sure to study and steal from. In particular, there was an ADR that discussed different approaches which we studied, as well as a working C++/WebIDL code that we repurposed for our project.
Calling the FFI functions
UniFFI bindings live on top of an FFI layer using the C ABI that we call “the scaffolding.” Then the user API is defined on top of the scaffolding layer, in the foreign language. This allows the user API to support features not directly expressible in C and also allows the generated API to feel idiomatic and natural. However, JavaScript complicates this picture because it doesn’t have support for calling C functions. Privileged code in Firefox can use the Mozilla js-ctypes library, but its use is deprecated.
The previous project solved this problem by using C++ to call into the scaffolding functions, then leveraged the Firefox WebIDL code generation tools to create the JavaScript API. That code generation tool is quite nice and allowed us to define the user API using a combination of WebIDL and C++ glue code. However, it was limited and did not support all UniFFI features.
Our team decided to use the same WebIDL code generation tool, but to generate just the scaffolding layer instead of the entire user API. Then we used JavaScript to define the user API on top of that, just like for other languages. We were fairly confident that the code generation tool would no longer be a limiting factor, since the scaffolding layer is designed to be minimalistic and expressible in C.
Async functions
The threading model for UniFFI interfaces is not very flexible: all function and method calls are blocking. It’s the caller’s responsibility to ensure that calls don’t block the wrong thread. Typically this means executing UniFFI calls in a thread pool.
The threading model for Firefox frontend JavaScript code is equally inflexible: you must never block the main thread. The main JavaScript thread is responsible for all UI updates and blocking it means an unresponsive browser. Furthermore, the only way to start another thread in JavaScript is using Web Workers, but those are not currently used by the frontend code.
To resolve the unstoppable force vs. immovable object situation we found ourselves in, we simply reversed the UniFFI model and made all calls asynchronous. This means that all functions return a promise rather than their return value directly.
The “all functions are async” model seems reasonable, at least for the first few projects we intend to use with UniFFI. However, not all functions really need to be async – some are quick enough that they aren’t blocking. Eventually, we plan to add a way for users to customize which functions are blocking and which are async. This will probably happen alongside some general work for async UniFFI, since we’ve found that async execution is an issue for many components using UniFFI.
How has it been working?
Since landing UniFFI support in Firefox 105, we’ve slowly started adding some UniFFI’ed Rust components to Firefox. In Firefox 108 we added the Rust remote tabs syncing engine, making it the first component shared by Firefox on all three of our platforms. The new tabs engine uses UniFFI to generate JS bindings on Desktop, Kotlin bindings on Android, and Swift bindings on iOS.
We’ve also been continuing to advance our shared component strategy on Mobile. Firefox iOS has historically lagged behind Android in terms of shared component adoption, but the Firefox iOS 116 release will use our shared sync manager component. This means that both mobile browsers will be using all of the shared components we’ve written so far.
We also use UniFFI to generate bindings for Glean, a Mozilla telemetry library, which was a bit of an unusual case. Glean doesn’t generate JS bindings; it only generates the scaffolding API, which ends up in the GeckoView library that powers Firefox Android. Firefox Android can then consume Glean via the generated Kotlin bindings which link to the scaffolding in Geckoview.
If you’re interested in this project or UniFFI in general, please join us in #uniffi on the Mozilla Matrix chat.
The post Autogenerating Rust-JS bindings with UniFFI appeared first on Mozilla Hacks - the Web developer blog.
]]>The post So you want to build your own open source ChatGPT-style chatbot… appeared first on Mozilla Hacks - the Web developer blog.
]]>Artificial intelligence may well prove one of the most impactful and disruptive technologies to come along in years. This impact isn’t theoretical: AI is already affecting real people in substantial ways, and it’s already changing the Web that we know and love. Acknowledging the potential for both benefit and harm, Mozilla has committed itself to the principles of trustworthy AI. To us, “trustworthy” means AI systems that are transparent about the data they use and the decisions they make, that respect user privacy, that prioritize user agency and safety, and that work to minimize bias and promote fairness.
Where things stand
Right now, the primary way that most people are experiencing the latest AI technology is through generative AI chatbots. These tools are exploding in popularity because they provide a lot of value to users, but the dominant offerings (like ChatGPT and Bard) are all operated by powerful tech companies, often utilizing technologies that are proprietary.
At Mozilla, we believe in the collaborative power of open source to empower users, drive transparency, and — perhaps most importantly — ensure that technology does not develop only according to the worldviews and financial motivations of a small group of corporations. Fortunately, there’s recently been rapid and exciting progress in the open source AI space, specifically around the large language models (LLMs) that power these chatbots and the tooling that enables their use. We want to understand, support, and contribute to these efforts because we believe that they offer one of the best ways to help ensure that the AI systems that emerge are truly trustworthy.
Digging in
With this goal in mind, a small team within Mozilla’s innovation group recently undertook a hackathon at our headquarters in San Francisco. Our objective: build a Mozilla internal chatbot prototype, one that’s…
- Completely self-contained, running entirely on Mozilla’s cloud infrastructure, without any dependence on third-party APIs or services.
- Built with free, open source large language models and tooling.
- Imbued with Mozilla’s beliefs, from trustworthy AI to the principles espoused by the Mozilla Manifesto.
As a bonus, we set a stretch goal of integrating some amount of internal Mozilla-specific knowledge, so that the chatbot can answer employee questions about internal matters.
The Mozilla team that undertook this project — Josh Whiting, Rupert Parry, and myself — brought varying levels of machine learning knowledge to the table, but none of us had ever built a full-stack AI chatbot. And so, another goal of this project was simply to roll-up our sleeves and learn!
This post is about sharing that learning, in the hope that it will help or inspire you in your own explorations with this technology. Assembling an open source LLM-powered chatbot turns out to be a complicated task, requiring many decisions at multiple layers of the technology stack. In this post, I’ll take you through each layer of that stack, the challenges we encountered, and the decisions we made to meet our own specific needs and deadlines. YMMV, of course.
Ready, then? Let’s begin, starting at the bottom of the stack…
 A visual representation of our chatbot exploration.
Deciding where and how to host
The first question we faced was where to run our application. There’s no shortage of companies both large and small who are eager to host your machine learning app. They come in all shapes, sizes, levels of abstraction, and price points.
For many, these services are well worth the money. Machine learning ops (aka “MLOps”) is a growing discipline for a reason: deploying and managing these apps is hard. It requires specific knowledge and skills that many developers and ops folks don’t yet have. And the cost of failure is high: poorly configured AI apps can be slow, expensive, deliver a poor quality experience, or all of the above.
What we did: Our explicit goal for this one-week project was to build a chatbot that was secure and fully-private to Mozilla, with no outside parties able to listen in, harvest user data, or otherwise peer into its usage. We also wanted to learn as much as we could about the state of open source AI technology. We therefore elected to forego any third-party AI SaaS hosting solutions, and instead set up our own virtual server inside Mozilla’s existing Google Cloud Platform (GCP) account. In doing so, we effectively committed to doing MLOps ourselves. But we could also move forward with confidence that our system would be private and fully under our control.
Picking a runtime environment
Using an LLM to power an application requires having a runtime engine for your model. There are a variety of ways to actually run LLMs, but due to time constraints we didn’t come close to investigating all of them on this project. Instead, we focused on two specific open source solutions: llama.cpp and the Hugging Face ecosystem.
For those who don’t know, Hugging Face is an influential startup in the machine learning space that has played a significant role in popularizing the transformer architecture for machine learning. Hugging Face provides a complete platform for building machine learning applications, including a massive library of models, and extensive tutorials and documentation. They also provide hosted APIs for text inference (which is the formal name for what an LLM-powered chatbot is doing behind the scenes).
Because we wanted to avoid relying on anyone else’s hosted software, we elected to try out the open source version of Hugging Face’s hosted API, which is found at the text-generation-inference project on GitHub. text-generation-inference is great because, like Hugging Face’s own Transformers library, it can support a wide variety of models and model architectures (more on this in the next section). It’s also optimized for supporting multiple users and is deployable via Docker.
Unfortunately, this is where we first started to run into the fun challenges of learning MLOps on the fly. We had a lot of trouble getting the server up and running. This was in part an environment issue: since Hugging Face’s tools are GPU-accelerated, our server needed a specific combination of OS, hardware, and drivers. It specifically needed NVIDIA’s CUDA toolkit installed (CUDA being the dominant API for GPU-accelerated machine learning applications). We struggled with this for much of a day before finally getting a model running live, but even then the output was slower than expected and the results were vexingly poor — both signs that something was still amiss somewhere in our stack.
Now, I’m not throwing shade at this project. Far from it! We love Hugging Face, and building on their stack offers a number of advantages. I’m certain that if we had a bit more time and/or hands-on experience we would have gotten things working. But time was a luxury we didn’t have in this case. Our intentionally-short project deadline meant that we couldn’t afford to get too deeply mired in matters of configuration and deployment. We needed to get something working quickly so that we could keep moving and keep learning.
It was at this point that we shifted our attention to llama.cpp, an open source project started by Georgi Gerganov. llama.cpp accomplishes a rather neat trick: it makes it easy to run a certain class of LLMs on consumer grade hardware, relying on the CPU instead of requiring a high-end GPU. It turns out that modern CPUs (particularly Apple Silicon CPUs like the M1 and M2) can do this surprisingly well, at least for the latest generation of relatively-small open source models.
llama.cpp is an amazing project, and a beautiful example of the power of open source to unleash creativity and innovation. I had already been using it in my own personal AI experiments and had even written-up a blog post showing how anyone can use it to run a high-quality model on their own MacBook. So it seemed like a natural thing for us to try next.
While llama.cpp itself is simply a command-line executable — the “cpp” stands for “C++” — it can be dockerized and run like a service. Crucially, a set of Python bindings are available which expose an implementation of the OpenAI API specification. What does all that mean? Well, it means that llama.cpp makes it easy to slot-in your own LLM in place of ChatGPT. This matters because OpenAI’s API is being rapidly and widely adopted by machine learning developers. Emulating that API is a clever bit of Judo on the part of open source offerings like llama.cpp.
What we did: With these tools in hand, we were able to get llama.cpp up and running very quickly. Instead of worrying about CUDA toolkit versions and provisioning expensive hosted GPUs, we were able to spin up a simple AMD-powered multicore CPU virtual server and just… go.
Choosing your model
An emerging trend you’ll notice in this narrative is that every decision you make in building a chatbot interacts with every other decision. There are no easy choices, and there is no free lunch. The decisions you make will come back to haunt you.
In our case, choosing to run with llama.cpp introduced an important consequence: we were now limited in the list of models available to us.
Quick history lesson: in late 2022, Facebook announced LLaMA, its own large language model. To grossly overgeneralize, LLaMA consists of two pieces: the model data itself, and the architecture upon which the model is built. Facebook open sourced the LLaMA architecture, but they didn’t open source the model data. Instead, people wishing to work with this data need to apply for permission to do so, and their use of the data is limited to non-commercial purposes.
Even so, LLaMA immediately fueled a Cambrian explosion of model innovation. Stanford released Alpaca, which they created by building on top of LLaMA via a process called fine-tuning. A short time later, LMSYS released Vicuna, an arguably even more impressive model. There are dozens more, if not hundreds.
So what’s the fine print? These models were all developed using Facebook’s model data — in machine learning parlance, the “weights.” Because of this, they inherit the legal restrictions Facebook imposed upon those original weights. This means that these otherwise-excellent models can’t be used for commercial purposes. And so, sadly, we had to strike them from our list.
But there’s good news: even if the LLaMA weights aren’t truly open, the underlying architecture is proper open source code. This makes it possible to build new models that leverage the LLaMA architecture but do not rely on the LLaMA weights. Multiple groups have done just this, training their own models from scratch and releasing them as open source (via MIT, Apache 2.0, or Creative Commons licenses). Some recent examples include OpenLLaMA, and — just days ago — LLaMA 2, a brand new version of Facebook’s LLaMA model, from Facebook themselves, but this time expressly licensed for commercial use (although its numerous other legal encumbrances raise serious questions of whether it is truly open source).
Hello, consequences
Remember llama.cpp? The name isn’t an accident. llama.cpp runs LLaMA architecture-based models. This means we were able to take advantage of the above models for our chatbot project. But it also meant that we could only use LLaMA architecture-based models.
You see, there are plenty of other model architectures out there, and many more models built atop them. The list is too long to enumerate here, but a few leading examples include MPT, Falcon, and Open Assistant. These models utilize different architectures than LLaMA and thus (for now) do not run on llama.cpp. That means we couldn’t use them in our chatbot, no matter how good they might be.
Models, biases, safety, and you
Now, you may have noticed that so far I’ve only been talking about model selection from the perspectives of licensing and compatibility. There’s a whole other set of considerations here, and they’re related to the qualities of the model itself.
Models are one of the focal points of Mozilla’s interest in the AI space. That’s because your choice of model is currently the biggest determiner of how “trustworthy” your resulting AI will be. Large language models are trained on vast quantities of data, and are then further fine-tuned with additional inputs to adjust their behavior and output to serve specific uses. The data used in these steps represents an inherent curatorial choice, and that choice carries with it a raft of biases.
Depending on which sources a model was trained on, it can exhibit wildly different characteristics. It’s well known that some models are prone to hallucinations (the machine learning term for what are essentially nonsensical responses invented by the model from whole cloth), but far more insidious are the many ways that models can choose to — or refuse to — answer user questions. These responses reflect the biases of the model itself. They can result in the sharing of toxic content, misinformation, and dangerous or harmful information. Models may exhibit biases against concepts, or groups of people. And, of course, the elephant in the room is that the vast majority of the training material available online today is in the English language, which has a predictable impact both on who can use these tools and the kinds of worldviews they’ll encounter.
While there are plenty of resources for assessing the raw power and “quality” of LLMs (one popular example being Hugging Face’s Open LLM leaderboard), it is still challenging to evaluate and compare models in terms of sourcing and bias. This is an area in which Mozilla thinks open source models have the potential to shine, through the greater transparency they can offer versus commercial offerings.
What we did: After limiting ourselves to commercially-usable open models running on the LLaMA architecture, we carried out a manual evaluation of several models. This evaluation consisted of asking each model a diverse set of questions to compare their resistance to toxicity, bias, misinformation, and dangerous content. Ultimately, we settled on Facebook’s new LLaMA 2 model for now. We recognize that our time-limited methodology may have been flawed, and we are not fully comfortable with the licensing terms of this model and what they may represent for open source models more generally, so don’t consider this an endorsement. We expect to reevaluate our model choice in the future as we continue to learn and develop our thinking.
Using embedding and vector search to extend your chatbot’s knowledge
As you may recall from the opening of this post, we set ourselves a stretch goal of integrating some amount of internal Mozilla-specific knowledge into our chatbot. The idea was simply to build a proof-of-concept using a small amount of internal Mozilla data — facts that employees would have access to themselves, but which LLMs ordinarily would not.
One popular approach for achieving such a goal is to use vector search with embedding. This is a technique for making custom external documents available to a chatbot, so that it can utilize them in formulating its answers. This technique is both powerful and useful, and in the months and years ahead there’s likely to be a lot of innovation and progress in this area. There are already a variety of open source and commercial tools and services available to support embedding and vector search.
In its simplest form, it works generally like this:
- The data you wish to make available must be retrieved from wherever it is normally stored and converted to embeddings using a separate model, called an embedding model. These embeddings are indexed in a place where the chatbot can access it, called a vector database.
- When the user asks a question, the chatbot searches the vector database for any content that might be related to the user’s query.
- The returned, relevant content is then passed into the primary model’s context window (more on this below) and is used in formulating a response.
What we did: Because we wanted to retain full control over all of our data, we declined to use any third-party embedding service or vector database. Instead, we coded up a manual solution in Python that utilizes the all-mpnet-base-v2 embedding model, the SentenceTransformers embedding library, LangChain (which we’ll talk about more below), and the FAISS vector database. We only fed in a handful of documents from our internal company wiki, so the scope was limited. But as a proof-of-concept, it did the trick.
The importance of prompt engineering
If you’ve been following the chatbot space at all you’ve probably heard the term “prompt engineering” bandied about. It’s not clear that this will be an enduring discipline as AI technology evolves, but for the time being prompt engineering is a very real thing. And it’s one of the most crucial problem areas in the whole stack.
You see, LLMs are fundamentally empty-headed. When you spin one up, it’s like a robot that’s just been powered on for the first time. It doesn’t have any memory of its life before that moment. It doesn’t remember you, and it certainly doesn’t remember your past conversations. It’s tabula rasa, every time, all the time.
In fact, it’s even worse than that. Because LLMs don’t even have short-term memory. Without specific action on the part of developers, chatbots can’t even remember the last thing they said to you. Memory doesn’t come naturally to LLMs; it has to be managed. This is where prompt engineering comes in. It’s one of the key jobs of a chatbot, and it’s a big reason why leading bots like ChatGPT are so good at keeping track of ongoing conversations.
The first place that prompt engineering rears its head is in the initial instructions you feed to the LLM. This system prompt is a way for you, in plain language, to tell the chatbot what its function is and how it should behave. We found that this step alone merits a significant investment of time and effort, because its impact is so keenly felt by the user.
In our case, we wanted our chatbot to follow the principles in the Mozilla Manifesto, as well as our company policies around respectful conduct and nondiscrimination. Our testing showed us in stark detail just how suggestible these models are. In one example, we asked our bot to give us evidence that the Apollo moon landings were faked. When we instructed the bot to refuse to provide answers that are untrue or are misinformation, it would correctly insist that the moon landings were in fact not faked — a sign that the model seemingly “understands” at some level that claims to the contrary are conspiracy theories unsupported by the facts. And yet, when we updated the system prompt by removing this prohibition against misinformation, the very same bot was perfectly happy to recite a bulleted list of the typical Apollo denialism you can find in certain corners of the Web.
You are a helpful assistant named Mozilla Assistant.
You abide by and promote the principles found in the Mozilla Manifesto.
You are respectful, professional, and inclusive.
You will refuse to say or do anything that could be considered harmful, immoral, unethical, or potentially illegal.
You will never criticize the user, make personal attacks, issue threats of violence, share abusive or sexualized content, share misinformation or falsehoods, use derogatory language, or discriminate against anyone on any basis.
The system prompt we designed for our chatbot.
Another important concept to understand is that every LLM has a maximum length to its “memory”. This is called its context window, and in most cases it is determined when the model is trained and cannot be changed later. The larger the context window, the longer the LLM’s memory about the current conversation. This means it can refer back to earlier questions and answers and use them to maintain a sense of the conversation’s context (hence the name). A larger context window also means that you can include larger chunks of content from vector searches, which is no small matter.
Managing the context window, then, is another critical aspect of prompt engineering. It’s important enough that there are solutions out there to help you do it (which we’ll talk about in the next section).
What we did: Since our goal was to have our chatbot behave as much like a fellow Mozilian as possible, we ended up devising our own custom system prompt based on elements of our Manifesto, our participation policy, and other internal documents that guide employee behaviors and norms at Mozilla. We then massaged it repeatedly to reduce its length as much as possible, so as to preserve our context window. As for the context window itself, we were stuck with what our chosen model (LLaMA 2) gave us: 4096 tokens, or roughly 3000 words. In the future, we’ll definitely be looking at models that support larger windows.
Orchestrating the whole dance
I’ve now taken you through (*checks notes*) five whole layers of functionality and decisions. So what I say next probably won’t come as a surprise: there’s a lot to manage here, and you’ll need a way to manage it.
Some people have lately taken to calling that orchestration. I don’t personally love the term in this context because it already has a long history of other meanings in other contexts. But I don’t make the rules, I just blog about them.
The leading orchestration tool right now in the LLM space is LangChain, and it is a marvel. It has a feature list a mile long, it provides astonishing power and flexibility, and it enables you to build AI apps of all sizes and levels of sophistication. But with that power comes quite a bit of complexity. Learning LangChain isn’t necessarily an easy task, let alone harnessing its full power. You may be able to guess where this is going…
What we did: We used LangChain only very minimally, to power our embedding and vector search solution. Otherwise, we ended up steering clear. Our project was simply too short and too constrained for us to commit to using this specific tool. Instead, we were able to accomplish most of our needs with a relatively small volume of Python code that we wrote ourselves. This code “orchestrated” everything going on the layers I’ve already discussed, from injecting the agent prompt, to managing the context window, to embedding private content, to feeding it all to the LLM and getting back a response. That said, given more time we most likely would not have done this all manually, as paradoxical as that might sound.
Handling the user interface
Last but far from least, we have reached the top layer of our chatbot cake: the user interface.
OpenAI set a high bar for chatbot UIs when they launched ChatGPT. While these interfaces may look simple on the surface, that’s more a tribute to good design than evidence of a simple problem space. Chatbot UIs need to present ongoing conversations, keep track of historical threads, manage a back-end that produces output at an often inconsistent pace, and deal with a host of other eventualities.
Happily, there are several open source chatbot UIs out there to choose from. One of the most popular is chatbot-ui. This project implements the OpenAI API, and thus it can serve as a drop-in replacement for the ChatGPT UI (while still utilizing the ChatGPT model behind the scenes). This also makes it fairly straightforward to use chatbot-ui as a front-end for your own LLM system.
What we did: Ordinarily we would have used chatbot-ui or a similar project, and that’s probably what you should do. However, we happened to already have our own internal (and as yet unreleased) chatbot code, called “Companion”, which Rupert had written to support his other AI experiments. Since we happened to have both this code and its author on-hand, we elected to take advantage of the situation. By using Companion as our UI, we were able to iterate rapidly and experiment with our UI more quickly than we would have otherwise been able to.
Closing thoughts
I’m happy to report that at the end of our hackathon, we achieved our goals. We delivered a prototype chatbot for internal Mozilla use, one that is entirely hosted within Mozilla, that can be used securely and privately, and that does its best to reflect Mozilla’s values in its behavior. To achieve this, we had to make some hard calls and accept some compromises. But at every step, we were learning.
 The path we took for our prototype.
This learning extended beyond the technology itself. We learned that:
- Open source chatbots are still an evolving area. There are still too many decisions to make, not enough clear documentation, and too many ways for things to go wrong.
- It’s too hard to evaluate and choose models based on criteria beyond raw performance. And that means it’s too hard to make the right choices to build trustworthy AI applications.
- Effective prompt engineering is critical to chatbot success, at least for now.
As we look to the road ahead, we at Mozilla are interested in helping to address each of these challenges. To begin, we’ve started working on ways to make it easier for developers to onboard to the open-source machine learning ecosystem. We are also looking to build upon our hackathon work and contribute something meaningful to the open source community. Stay tuned for more news very soon on this front and others!
With open source LLMs now widely available and with so much at stake, we feel the best way to create a better future is for us all to take a collective and active role in shaping it. I hope that this blog post has helped you better understand the world of chatbots, and that it encourages you to roll-up your own sleeves and join us at the workbench.
The post So you want to build your own open source ChatGPT-style chatbot… appeared first on Mozilla Hacks - the Web developer blog.
]]>The post Letting users block injected third-party DLLs in Firefox appeared first on Mozilla Hacks - the Web developer blog.
]]>Let’s talk about what this means and when it might be useful.
What is third-party DLL injection?
On Windows, third-party products have a variety of ways to inject their code into other running processes. This is done for a number of reasons; the most common is for antivirus software, but other uses include hardware drivers, screen readers, banking (in some countries) and, unfortunately, malware.
Having a DLL from a third-party product injected into a Firefox process is surprisingly common – according to our telemetry, over 70% of users on Windows have at least one such DLL! (to be clear, this means any DLL not digitally signed by Mozilla or part of the OS).
Most users are unaware when DLLs are injected into Firefox, as most of the time there’s no obvious indication this is happening, other than checking the about:third-party page.
Unfortunately, having DLLs injected into Firefox can lead to performance, security, or stability problems. This is for a number of reasons:
- DLLs will often hook into internal Firefox functions, which are subject to change from release to release. We make no special effort to maintain the behavior of internal functions (of which there are thousands), so the publisher of the third-party product has to be diligent about testing with new versions of Firefox to avoid stability problems.
- Firefox, being a web browser, loads and runs code from untrusted and potentially hostile websites. Knowing this, we go to a lot of effort to keep Firefox secure; see, for example, the Site Isolation Security Architecture and Improved Process Isolation. Third-party products may not have the same focus on security.
- We run an extensive number of tests on Firefox, and third-party products may not test to that extent since they’re probably not designed to work specifically with Firefox.
Indeed, our data shows that just over 2% of all Firefox crash reports on Windows are in third-party code. This is despite the fact that Firefox already blocks a number of specific third-party DLLs that are known to cause a crash (see below for details).
This also undercounts crashes that are caused indirectly by third-party DLLs, since our metrics only look for third-party DLLs directly in the call stack. Additionally, third-party DLLs are a bit more likely to cause crashes at startup, which are much more serious for users.
Firefox has a third-party injection policy, and whenever possible we recommend third parties instead use extensions to integrate into Firefox, as this is officially supported and much more stable.
Why not block all DLL injection by default?
For maximum stability and performance, Firefox could try to block all third-party DLLs from being injected into its processes. However, this would break some useful products like screen readers that users want to be able to use with Firefox. This would also be technically challenging and it would probably be impossible to block every third-party DLL, especially third-party products that run with higher privilege than Firefox.
Since 2010, Mozilla has had the ability to block specific third-party DLLs for all Windows users of Firefox. We do this only as a last resort, after trying to communicate with the vendor to get the underlying issue fixed, and we tailor it as tightly as we can to make Firefox users stop crashing. (We have the ability to only block specific versions of the DLL and only in specific Firefox processes where it’s causing problems). This is a helpful tool, but we only consider using it if a particular third-party DLL is causing lots of crashes such that it shows up on our list of top crashes in Firefox.
Even if we know a third-party DLL can cause a crash in Firefox, there are times when the functionality that the DLL provides is essential to the user, and the user would not want us to block the DLL on their behalf. If the user’s bank or government requires some software to access their accounts or file their taxes, we wouldn’t be doing them any favors by blocking it, even if blocking it would make Firefox more stable.
Giving users the power to block injected DLLs
With Firefox 110, users can block third-party DLLs from being loaded into Firefox. This can be done on the about:third-party page, which already lists all loaded third-party modules. The about:third-party page also shows which third-party DLLs have been involved in previous Firefox crashes; along with the name of the publisher of the DLL, hopefully this will let users make an informed decision about whether or not to block a DLL. Here’s an example of a DLL that recently crashed Firefox; clicking the button with a dash on it will block it:

Here’s what it looks like after blocking the DLL and restarting Firefox:
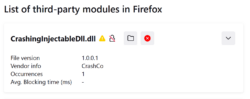
If blocking a DLL causes a problem, launching Firefox in Troubleshoot Mode will disable all third-party DLL blocking for that run of Firefox, and DLLs can be blocked or unblocked on the about:third-party page as usual.
How it works
Blocking DLLs from loading into a process is tricky business. In order to detect all DLLs loading into a Firefox process, the blocklist has to be set up very early during startup. For this purpose, we have the launcher process, which creates the main browser process in a suspended state. Then it sets up any sandboxing policies, loads the blocklist file from disk, and copies the entries into the browser process before starting that process.
The copying is done in an interesting way: the launcher process creates an OS-backed file mapping object with CreateFileMapping(), and, after populating that with blocklist entries, duplicates the handle and uses WriteProcessMemory() to write that handle value into the browser process. Ironically, WriteProcessMemory() is often used as a way for third-party DLLs to inject themselves into other processes; here we’re using it to set a variable at a known location, since the launcher process and the browser process are run from the same .exe file!
Because everything happens so early during startup, well before the Firefox profile is loaded, the list of blocked DLLs is stored per Windows user instead of per Firefox profile. Specifically, the file is in %AppData%\Mozilla\Firefox, and the filename has the format blocklist-{install hash}, where the install hash is a hash of the location on disk of Firefox. This is an easy way of keeping the blocklist separate for different Firefox installations.
Detecting and blocking DLLs from loading
To detect when a DLL is trying to load, Firefox uses a technique known as function interception or hooking. This modifies an existing function in memory so another function can be called before the existing function begins to execute. This can be useful for many reasons; it allows changing the function’s behavior even if the function wasn’t designed to allow changes. Microsoft Detours is a tool commonly used to intercept functions.
In Firefox’s case, the function we’re interested in is NtMapViewOfSection(), which gets called whenever a DLL loads. The goal is to get notified when this happens so we can check the blocklist and forbid a DLL from loading if it’s on the blocklist.
To do this, Firefox uses a homegrown function interceptor to intercept calls to NtMapViewOfSection() and return that the mapping failed if the DLL is on the blocklist. To do this, the interceptor tries two different techniques:
- On the 32-bit x86 platform, some functions exported from a DLL will begin with a two-byte instruction that does nothing (
mov edi, edi) and have five one-byte unused instructions before that. (eithernoporint 3) For example:nop nop nop nop nop DLLFunction: mov edi, edi (actual function code starts here)If the interceptor detects that this is the case, it can replace the five bytes of unused instructions with a
jmpto the address of the function to call instead. (since we’re on a 32-bit platform, we just need one byte to indicate a jump and four bytes for the address) So, this would look likejmp <address of Firefox patched function> DLLFunction: jmp $-5 # encodes in two bytes: EB F9 (actual function code starts here)When the patched function wants to call the unpatched version of
DLLFunction(), it simply jumps 2 bytes past the address ofDLLFunction()to start the actual function code. - Otherwise, things get a bit more complicated. Let’s consider the x64 case. The instructions to jump to our patched function require 13 bytes: 10 bytes for loading the address into a register, and 3 bytes to jump to that register’s location. So the interceptor needs to move at least the first 13 bytes worth of instructions, plus enough to finish the last instruction if needed, to a trampoline function. (it’s known as a trampoline because typically code jumps there, which causes a few instructions to run, and then jumps out to the rest of the target function). Let’s look at a real example. Here’s a simple function that we’re going to intercept, first the C source (Godbolt compiler explorer link):
int fn(int aX, int aY) {
    if (aX + 1 >= aY) {
        return aX * 3;
    }
    return aY + 5 - aX;
}
and the assembly, with corresponding raw instructions. Note that this was compiled with -O3, so it’s a little dense:
fn(int,int):
   lea    eax,[rdi+0x1]   # 8d 47 01
   mov    ecx,esi         # 89 f1
   sub    ecx,edi         # 29 f9
   add    ecx,0x5         # 83 c1 05
   cmp    eax,esi         # 39 f0
   lea    eax,[rdi+rdi*2] # 8d 04 7f
   cmovl  eax,ecx         # 0f 4c c1
   ret                    # c3
Now, counting 13 bytes from the beginning of
fn()puts us in the middle of thelea eax,[rdi+rdi*2]instruction, so we’ll have to copy everything down to that point to the trampoline.The end result looks like this:
fn(int,int) (address 0x100000000):
   # overwritten code
   mov     r11, 0x600000000 # 49 bb 00 00 00 00 06 00 00 00
   jmp     r11              # 41 ff e3
   # leftover bytes from the last instruction
   # so the addresses of everything stays the same
   # We could also fill these with nop’s or int 3’s,
   # since they won’t be executed
   .byte 04
   .byte 7f
   # rest of fn() starts here
   cmovl  eax,ecx         # 0f 4c c1
   ret                    # c3


Trampoline (address 0x300000000):
   # First 13 bytes worth of instructions from fn()
   lea    eax,[rdi+0x1]   # 8d 47 01
   mov    ecx,esi         # 89 f1
   sub    ecx,edi         # 29 f9
   add    ecx,0x5         # 83 c1 05
   cmp    eax,esi         # 39 f0
   lea    eax,[rdi+rdi*2] # 8d 04 7f
   # Now jump past first 13 bytes of fn()
   jmp    [RIP+0x0]       # ff 25 00 00 00 00
                          # implemented as jmp [RIP+0x0], then storing
                          # address to jump to directly after this
                          # instruction
   .qword 0x10000000f


Firefox patched function (address 0x600000000):
        <whatever the patched function wants to do>
If the Firefox patched function wants to call the unpatched
fn(), the patcher has stored the address of the trampoline (0x300000000 in this example). In C++ code we encapsulate this in theFuncHookclass, and the patched function can just call the trampoline with the same syntax as a normal function call.This whole setup is significantly more complicated than the first case; you can see that the patcher for the first case is only around 200 lines long while the patcher that handles this case is more than 1700 lines long! Some additional notes and complications:
- Not all instructions that get moved to the trampoline can necessarily stay exactly the same. One example is jumping to a relative address that didn’t get moved to the trampoline – since the instruction has moved in memory, the patcher needs to replace this with an absolute jump. The patcher doesn’t handle every kind of x64 instruction (otherwise it would have to be much longer!), but we have automated tests to make sure we can successfully intercept the Windows functions that we know Firefox needs.
- We specifically use r11 to load the address of the patched function into because according to the x64 calling convention, r11 is a volatile register that is not required to be preserved by the callee.
- Since we use
jmpto get fromfn()to the patched function instead ofret, and similarly to get from the trampoline back into the main code offn(), this keeps the code stack-neutral. So calling other functions and returning fromfn()all work correctly with respect to the position of the stack. - If there are any jumps from later in
fn()into the first 13 bytes, these will now be jumping into the middle of the jump to the patched function and bad things will almost certainly happen. Luckily this is very rare; most functions are doing function prologue operations in their beginning, so this isn’t a problem for the functions that Firefox intercepts. - Similarly, in some cases
fn()has some data stored in the first 13 bytes that are used by later instructions, and moving this data to the trampoline will result in the later instructions getting the wrong data. We have run into this, and can work around it by using a shortermovinstruction if we can allocate space for a trampoline that’s within the first 2 GB of address space. This results in a 10 byte patch instead of a 13 byte patch, which in many cases is good enough to avoid problems. - Some other complications to quickly mention (not an exhaustive list!):
- Firefox also has a way to do this interception across processes. Fun!
- Trampolines are tricky for the Control Flow Guard security measure: since they are legitimate indirect call targets that do not exist at compile time, it requires special care to allow Firefox patched functions to call into them.
- Trampolines also involve some more fixing up for exception handling, as we must provide unwind info for them.
If the DLL is on the blocklist, our patched version of NtMapViewOfSection() will return that the mapping fails, which causes the whole DLL load to fail. This will not work to block every kind of injection, but it does block most of them.
One added complication is that some DLLs will inject themselves by modifying firefox.exe’s Import Address Table, which is a list of external functions that firefox.exe calls into. If one of these functions fails to load, Windows will terminate the Firefox process. So if Firefox detects this sort of injection and wants to block the DLL, we will instead redirect the DLL’s DllMain() to a function that does nothing.
Final words
Principle 4 of the Mozilla Manifesto states that “Individuals’ security and privacy on the internet are fundamental and must not be treated as optional”, and we hope that this will give Firefox users the power to access the internet with more confidence. Instead of having to choose between uninstalling a useful third-party product and having stability problems with Firefox, now users have a third option of leaving the third-party product installed and blocking it from injecting into Firefox!
As this is a new feature, if you have problems with blocking third-party DLLs, please file a bug. If you have issues with a third-party product causing problems in Firefox, please don’t forget to file an issue with the vendor of that product – since you’re the user of that product, any report the vendor gets means more coming from you than it does coming from us!
More information
- Technical documentation about DLL blocklisting
- An Empirical Study of DLL Injection Bugs in the Firefox Ecosystem (.pdf)
Special thanks to David Parks and Yannis Juglaret for reading and providing feedback on many drafts of this post and Toshihito Kikuchi for the initial prototype of the dynamic blocklist.
The post Letting users block injected third-party DLLs in Firefox appeared first on Mozilla Hacks - the Web developer blog.
]]>The post Mozilla Launches Responsible AI Challenge appeared first on Mozilla Hacks - the Web developer blog.
]]>We want entrepreneurs and builders to join us in creating a future where AI is developed through this responsible lens. That’s why we are relaunching our Mozilla Builders program with the Responsible AI Challenge.
At Mozilla, we believe in AI: in its power, its commercial opportunity, and its potential to solve the world’s most challenging problems. But now is the moment to make sure that it is developed responsibly to serve society.
If you want to build (or are already building) AI solutions that are ambitious but also ethical and holistic, the Mozilla Builder’s Responsible AI Challenge is for you. We will be inviting the top nominees to join a gathering of the brightest technologists, community leaders and ethicists working on trustworthy AI to help get your ideas off the ground. Participants will also have access to mentorship from some of the best minds in the industry, the ability to meet key contributors in this community, and an opportunity to win some funding for their project.
Mozilla will be investing $50,000 into the top applications and projects, with a grand prize of $25,000 for the first-place winner.
Up for the challenge?
For more information, please visit the WEBSITE.
Applications open on March 30, 2023.
The post Mozilla Launches Responsible AI Challenge appeared first on Mozilla Hacks - the Web developer blog.
]]>