
Reverb
Introduction
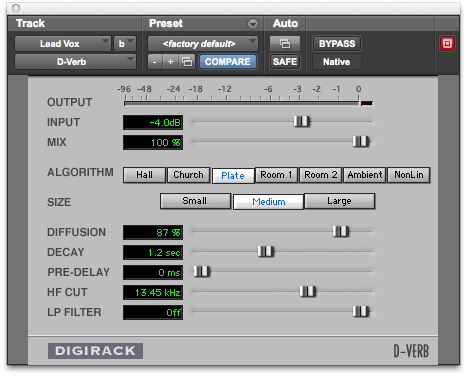
In this tutorial we will be looking at reverb and how it can be used within your mixes, in particular we will be referencing Digidesign’s ‘D-Verb’ plug-in although you will notice across different reverb units that the optional variables are roughly the same.
What is reverb?
Reverb or ‘reverberation’ is not simply just an effect which makes vocals sound nice! It is what we hear everyday and allows us to almost ‘hear’ the environment around us. If you were to shout inside a tunnel, your voice (the ‘direct’ sound) would travel outwards to bounce off surfaces around in all kinds of directions which eventually return back to your ears, it is these reflected sounds which is the reverberation.
While a tunnel is of course an extreme example, when you really think about it, you can probably hear as subtle a difference as walking from your bedroom to your hallway despite them probably not being too dissimilar in size. With that in mind it is important within your mixes to make use of reverb delicately as it can very quickly ruin the sound of a mix if used inappropriately.
How can it help my mix?
Reverb within music productions helps to give a mix depth, if panning is the tool to let you decide where elements are placed between the left and right speaker, it is reverb which lets you decide whether an instrument is right in front of you or set further backwards within your mix. While there are no rules or specific instruments which strictly require the effect, once understood it will give you the ability to place an instrument exactly where you want it.
When you get more comfortable using reverb, you can experiment with settings and track routing to add width. For instance, you could try Mid/Side processing to add space to the sides of your mix, or hard-panning the reverb element perhaps with a high pass filter which will add more of a sense of distance.
Settings
Now we’ve covered a few things that can be achieved with the effect, lets look at the typical reverb unit’s settings and what they do.
Input: The input level slider simply sets how loud the signal coming into the plug-in is, this can be brought down if the signal is clipping or brought up if your signal level is fine and you simply want to hear a little more of the processed signal.
Output meter: This meter will show the output of the sound after processing, if this is clipping then you may need to tweak you input signal slightly.
Mix: This slider will allow you to set a mix value percentage between your direct sound and your reverberant sounds. Going back to our earlier tunnel example, 0% would be just the pure shout sound, and 100% would be the sound of the reflections bounced off the tunnel. 50% is generally a good place to start from which you can tweak it to hear more of your original or modified sound, although it is common practice to set the mix value to 100% if the reverb effect is being used on an auxiliary track. In this instance, you will control the wet/dry mix using each source track’s send level.
You will now notice some algorithms for you to choose, we will explain these after we have gone through the other settings for you to play with.
Diffusion: Diffusion refers to the distribution of sound pressure in a space. A room is fully diffuse when sound is evenly distributed throughout the room after propagation.
Decay: This time-based parameter denotes how long the reverberation continues after the direct sound has ended. To avoid a ‘muddy’ sounding instrument, you might find it useful to change the decay value so that the reverberant sound has faded before the next instance of the direct sound; such as on snare drums. An inappropriate decay setting will cause an unwanted build up of reverb and will make your instruments much less defined.
Pre-Delay: This value sets the time between the original direct sound and the reverberation which follows it, this is useful in falsely creating the size of an environment around you. The easiest way of thinking about it again is the tunnel example, the sound of a shout in a small tunnel will be very different to that of a larger sized tunnel as the time taken for it to reach the edges is different, this is the equivalent of the pre-delay value. Usually, you will want some degree of pre-delay as the listener would hear the direct sound before the reverberant field.
Frequency Manipulation: An often overlooked consideration when working with reverb are the frequencies which will be present within the reverberant sound. If you have a high-frequency dominant instrument with a reverb applied, these frequencies will of course be dominant in the reverberant sound which has the potential to mix and slur other instruments that are within the same range, we therefore need to filter the reverberant sound to help it sit more comfortably within the mix.
The hi-frequency cut slider will allow you to set a frequency cut-off to make higher frequencies less dominant after the direct sound. By moving the slider hard to the right hand side you can set it ‘off’ which will leave the sound untouched.
The low pass filter sets the frequency value above which a 6dB per octave filter will cutoff the reverberant signal.
The two filters work together to shape the sound of the reverb you are applying, you should tweak both until you feel that you can comfortably hear the reverberant effect while making sure that it is not obstructing the sound of any other instruments within your mix.
Algorithms: There are a number of algorithms that we skipped past earlier in the tutorial, these are almost like starting pre-set values for you to work from and I believe it is best to actually understand what is being tweaked before delving into these to avoid the temptation of simply putting up with a set value, hence why we have left these until last.
You will have the option of seven space algorithms (digitally recreated environments) within the D-verb plug-in, while the names will be familiar, lets first talk about what sonic effect you should expect from each of them.
Hall: This represents a general concert hall with a natural sounding character, perhaps useful on flowing orchestral sounds to sit in the background of your mix.
Church: Can be tricky to distinguish from the hall algorithm, however this setting will produce a much more diffuse sound with a long decay time and a slightly longer pre-delay to emulate the expected surface distances.
Plate: Emulates how false reverb was created before digital plug-ins, where a sound was sent to a vibrating metal plate from which vibrations were then captured. Plate reverbs tend to sound bright and work particularly well on vocals and percussive elements.
Room 1: A medium sized room with very natural sounding reflections.
Room 2: A smaller and brighter environment which can be used when only a very subtle touch is required.
Ambient: This is a great setting for adding ‘space’ to a sound and features very few definitive characteristics.
Nonlinear: Probably the least commonly understood setting, this algorithm produces a natural sounding build up in reverb with an quick cutoff, almost like a gate. This again is an interesting setting to try out on percussive instruments which feature definitive attack sounds.
You will notice after choosing your algorithm that there are three sizes of that environment available, small, medium, and large of which characteristics change based on the chosen space. Not much can be said about their sonic effect that you would not already expect so the best thing to do is play around and see what you think sounds best.
If you have read the setting terms and are still a little unsure as to what they are doing to the sound, try jumping between algorithms while keeping an eye on what settings are exactly changing and this should help you to really understand their sonic effects.
Final Words
I hope you have gained a better understanding of what reverb is and what settings you will need to change to achieve the effect your mix needs. As with most other production effects, there is no ‘magic’ setting to make your instruments sound more professional but do keep in mind that if not treated with care it can easily pull a good sounding mix apart.
Remember that a well crafted reverb application should generally be quite subtle and not distracting to the listener.
If you have found this tutorial useful or want to tell us of a particular way in which you like to use reverb within your mixes then please either leave us a comment below or on Twitter .
