
De-Verb
Introduction
In our opinion, the worst thing you can come across as a post production mixer is a bad quality recording, the classic saying of ‘You can’t polish poop‘. While there are many brilliant plug-ins for removing noise, clicks, and pops, reverb is still a very tricky area when it is printed onto a recording.
Many engineers will share their techniques including gating and phase inversion tricks etc, but these are not always designed solely for these kind of issues. The company SPL (Sound Performance Lab) however have designed a plug-in which is pretty revolutionary, by the name of De-Verb.
What is De-Verb?
De-Verb is a plug-in which isn’t too dissimilar from SPL’s older ‘Transient Designer’ plug-in (if you are familiar) which allows you to set attack and release values to create more or less sustain for example, the idea of De-Verb being that the reverb tails can be removed to give the perception of a dryer sound.
The difference with De-verb is that all of the threshold, attack and sustain controls are automatic and simply react to the input signal in a musical way which makes a usually complicated task a matter of tweaking a couple of knobs!
The Interface
So this plug-in is capable of hiding the sound of reverb but yet only has two knobs and a single button? Well yes!
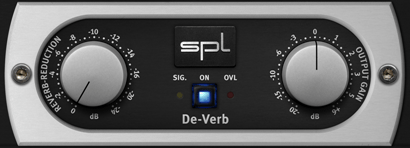
While we are looking here we can also talk about those two commonly found lights either side as well, ‘SIG’ or Signal will light when a signal is present, useful in ensuring that the particular channel has a sufficient level to work with, you will also see a ‘OVL’ or Overload light which simply indicates internal clipping, as ever it is best to avoid hitting the red so jump back and drop that input signal until both the signal and overload lights are happy!
Next up are the (pretty self explanatory) knobs, that’s right, the SPL guys have thinned all of that insane processing that is going on in the background down to just two simple controls. The first on the left decides how much of the ‘detected reverb’ is removed from the signal, and the control on the right is simply some make up gain in case it has caused a drop in level.
I know what you’re thinking….’well I don’t want any reverb on my signal so I’ll just slam that reduction control to the max’….well, while this plugin is great at what it does, overuse will result in some pretty audible changes, push it too far and you will notice some frequencies you wanted to maintain start to drop off and it will start to sound a little bit ‘phasey’, the trick is to find the middle ground.
I usually start with the gain reduction at zero and slowly back it off until I have a happy medium of reverb reduction before the original signal I want to keep begins to suffer, it all comes down to feel and you will quickly see what this is capable of after just a few minutes of use.
Final Words
Not so much a tutorial here but a thorough recommendation, if you find yourself constantly pulling your hair out in post trying to tidy up poor handovers, give this a try now! SPL offer a free 14 day trial of the plugin so it’s a no brainer to give it a try at least!
